A bit of context
If you come here for some working examples of Neovim (version 0.6.1) configuration, particularly one involving the newly officially supported tree-sitter and LSP features, feel free to skip this section and jump straight to the one showing the configs. One more word of notice though: as I mostly only code in Python (with only occasional Fortran and Matlab), the language server protocol (LSP) relevant configs will only contain the Python language. But you may find some parts of the experiences transferable to other languages as well.
Now let’s get into the topic.
My getting used to Vim
I learned to use Vim about 11 years ago, at the same time as I started to
learn Python. I actually don’t quite recall at the moment what exactly was the
motivation that pushed me through the steep learning curve of Vim, but
somehow I made the commitment and got used to the Vim keys and have
been using it as my primary text editor ever since.
Like many others, I picked up some new knowledge about Vim now and then, and have setup a handful of plugins and a median-sized config file along the way to make the tool more handy to my daily work. But, unlike some really advanced players who know the ins-and-outs of Vim, I still don’t have a deep understanding of Vim’s underlying functioning, nor a good grasp of vimscript. (That being said, A few years ago, I did spent some time reading about vimscripting, and managed to fork a plugin, and created another of my own. But without repeated reviewing that limited amount of vimscript knowledge has largely gone.)
My approach towards Vim customization has been: devote some free time to research, experiment and mess with the configs to my liking, and pretty much leave the config untouched for the next few months, or perhaps even a year, until the next episode of itch for tinkering arrives.
And here it comes, the decision to migrate from Vim to Neovim is one such episode.
What is Neovim about
The following description is largely second-hand knowledge I gathered from other sources (listed at the end):
- Neovim is a modern reincarnation of the classic Vim editor, much like Vim is an improved version of its own predecessor, vi.
- Vim is largely modulated by its creator Bram Moolenaar, while Neovim is more community driven, therefore enjoys a faster pace in adopting new features.
- Neovim was initiated to rebuild the Vim editor on a cleaner code base, with extra functionalities such as asynchronous execution hard-wired.
- Thanks to this friendly competition, the development of Vim has being trying to catch up the pace, e.g. async execution is supported by Vim since version 8.
- Both Vim and Neovim support plugins written in the lua language, but Neovim has made lua a "first class citizen". As a result, one can configure Neovim using entirely lua instead of vimscript.
- Neovim has made many changes in the default settings that many Vim users eventually make in their settings anyways, thus creating a better out-of-the-box experience.
So in a nutshell: Neovim is a more modern Vim, and its emergence has stirred up some friendly competitions between the two. Consequently, things tend to change faster, and existing differences may disappear and new ones may come into being. That’s the reason (aside from the SEO trick that everyone seems to be using) I put "at the beginning of 2022" in the title: to give a sort of context about the current vim-editor landscape and as a reminder that what’s functioning now may become deprecated later. The latter point maybe particularly important, considering the fast pace of development of Neovim.
Version, Specs and what’s to be covered
Here are my specs and version of Neovim:
OS: Manjaro Linux.
Installation method: from Manjaro’s repository (pacman -S neovim)
Neovim version (outputs from neovim --version):
NVIM v0.6.1
Build type: Release
LuaJIT 2.0.5
Compiled by builduser

Features: +acl +iconv +tui
See ":help feature-compile"

   system vimrc file: "$VIM/sysinit.vim"
  fall-back for $VIM: "/usr/share/nvim"

Run :checkhealth for more info
The following sections will cover:
- My new Neovim configs.
- Plugin manager: vim-plug.
- Syntax highlighting using tree-sitter.
- Language server protocol (LSP) config for Python.
- Auto-completion using nvim-cmp.
- Some other settings worth mentioning.
- Some pitfalls I fell into when setting up Neovim.
- Some thoughts about my Vim-Neovim migration experience.
- Some helpful references I read/watched.
Before we start: I’ve seen many people structure their Neovim configs
using lua in a folder structure. But as I’m still trying to get my
head around the lua syntax, and my config file is not that big, so I
will be using a single init.vim file instead.
To embed lua code in init.vim, one needs to put the code in the
following manner:
lua <<EOF

-- your lua configs here, e.g.
require'lspconfig'.pyright.setup{}

EOF
The new Neovim config
vim-plug plugin manager
In Vim, I’ve been using Vundle as the plugin manager and it has been working flawlessly. I tested it out in Neovim and can confirm that Vundle works for Neovim as well. But vim-plug seems to be more popular nowadays, and for the sake of change, I decided to give vim-plug a try.
The vim-plug Github page gives pretty clear installation
instructions. Basically one downloads the plugin file (plug.vim) and saves that
into the autoload folder inside the data folder of Neovim. By
default, the save location is ~/.local/share/nvim/autoload/plug.vim.
This is one of many things that confused me a bit at the beginning: Now, Neovim uses 2 separate saving locations:
- config folder, accessible via the variable
stdpath('config'), default to~/.config/nvim/. - data folder, accessible via
stdpath('data'), default to~/.local/share/nvim/.
I feel that this is a bit scattered, so I decided to put everything within the config folder instead.
I’d also like to make the config more portable and easier to setup in
a new machine, therefore I used this following snippet (obtained from
this Github issue post that
automatically downloads vim-plug (if not already existing) when the
init.vim file is opened, and installs the required plugins:
" auto install vim-plug and plugins:
let plug_install = 0
let autoload_plug_path = stdpath('config') . '/autoload/plug.vim'
if !filereadable(autoload_plug_path)
    execute '!curl -fL --create-dirs -o ' . autoload_plug_path .
        \ ' https://raw.github.com/junegunn/vim-plug/master/plug.vim'
    execute 'source ' . fnameescape(autoload_plug_path)
    let plug_install = 1
endif
unlet autoload_plug_path

call plug#begin(stdpath('config') . '/plugged')

" plugins here ...
Plug 'scrooloose/nerdtree'

call plug#end()
call plug#helptags()

" auto install vim-plug and plugins:
if plug_install
    PlugInstall --sync
endif
unlet plug_install
Note that I use stdpath('config') instead of stdpath('data') at
line 3 and line 12 so everything goes into the
~/.config/nvim/ folder.
After populating the plugin list inside the lines of call plug#begin()
and call plug#end(), one needs to run :PlugInstall to install them.
Figure 1 below shows the side-pane of vim-plug on the left and the
list of plugins installed.
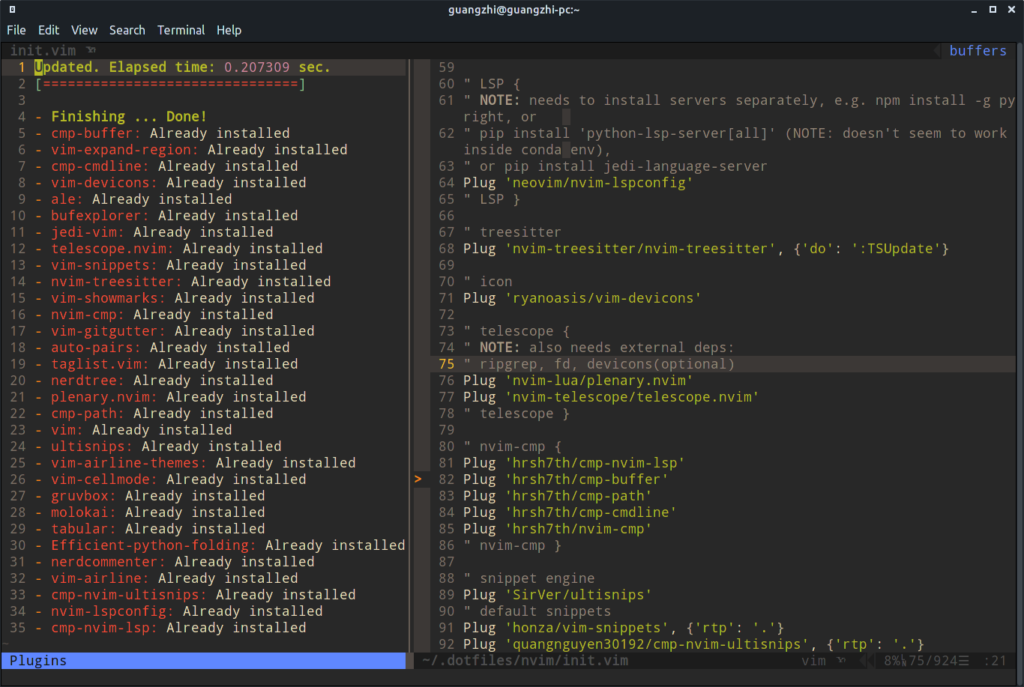

init.vim config file, and the vim-plug side-pane on the left. Colorscheme: gruvbox, air-line theme: behelit. nvim-treesitter
As far as I understand, tree-sitter is another method (I don’t know exactly what) of parsing the codes of a programming language, in a different way from the old method which is based on regular expressions (Regex). And nvim-treesitter, native to Neovim since version 0.5, is an interfacing layer for Neovim to communicate with tree-sitter.
What benefits does tree-sitter provide?
I think the most notable and intuitive improvement is better syntax highlighting.
The README of nvim-treesitter provides some comparisons. And Figure 2 below is another comparison I made. Aside from the different color choices, the tree-sitter powered syntax highlighting indeed picks up more syntactic elements from the Python codes. And this is largely true for other languages as well.
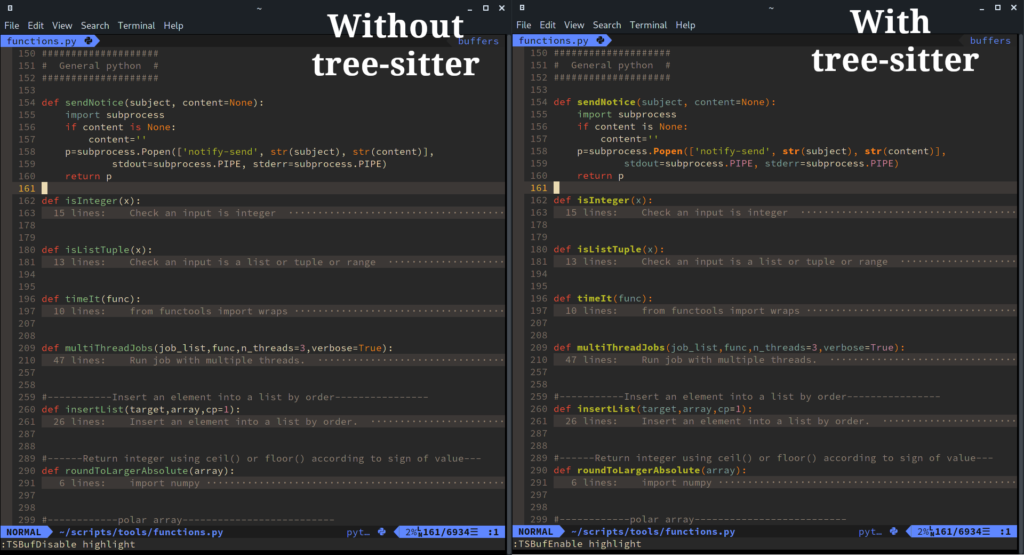

To install nvim-treesitter, put this line to the vim-plug plugin list:
Plug 'nvim-treesitter/nvim-treesitter', {'do': ':TSUpdate'}
The relevant configs:
lua <<EOF
require'nvim-treesitter.configs'.setup {
  ensure_installed = {
    "python",
    "fortran",
	"bash",
	"c",
	"cpp",
	"bibtex",
	"latex",
  },

  -- Install languages synchronously (only applied to `ensure_installed`)
  sync_install = false,

  -- List of parsers to ignore installing
  ignore_install = { "haskell" },

  highlight = {
    -- `false` will disable the whole extension
    enable = true,
    -- list of language that will be disabled
    disable = { "" },

    -- Setting this to true will run `:h syntax` and tree-sitter at the same time.
    -- Set this to `true` if you depend on 'syntax' being enabled (like for indentation).
    -- Using this option may slow down your editor, and you may see some duplicate highlights.
    -- Instead of true it can also be a list of languages
    additional_vim_regex_highlighting = false,
  },

  indent = {
    -- dont enable this, messes up python indentation
    enable = false,
    disable = {},
  },
}
EOF

" Folding
set foldmethod=expr
set foldexpr=nvim_treesitter#foldexpr()
Again, the part inside lua <<EOF and EOF is lua code, the 2 lines
involving folding is vimscript. Both largely copied/modded from
nvim-treesitter Github page.
The ensure_installed table (lua terminology) lists the language
supports I want nvim-treesitter to automatically download the first
time it is run. One can also use the value of 'all' or
'maintained' to obtain all languages, or all languages with a
maintainer.
Another thing to note is that I’ve found the intent module doesn’t
seem to work well with Python, so I disabled this module
entirely. Alternatively, I could have added 'python' to the disable table
for the indent module.
LSP
Language Server Protocol (LSP) is supported nativity by Neovim since version
0.5 (at the time of writing, it is further requiring v0.6.1). As
far as I understand, it is a standard created by Microsoft to
provide a unified framework for text editors or IDEs to support
different programming languages. Thanks to this standard, the number
of interfaces/data-flows between n number of editors/IDEs and m
number of different languages can be reduced from n * m to n + m. This blog by Jake Wiesler gives some more explanation regarding
LSP.
Neovim supports LSP via the nvim-lspconfig plugin, which acts as a
LSP client with sane default configs for a whole range of
languages.
To install nvim-lspconfig:
Plug 'neovim/nvim-lspconfig'
I found LSP a bit difficult to configure, and here is my current setup:
lua <<EOF
local nvim_lsp = require('lspconfig')
local on_attach = function(client, bufnr)
local function buf_set_keymap(...)
vim.api.nvim_buf_set_keymap(bufnr, ...)
end
local function buf_set_option(...)
vim.api.nvim_buf_set_option(bufnr, ...)
end
buf_set_option('omnifunc', 'v:lua.vim.lsp.omnifunc')
-- Mappings
local opts = { noremap=true, silent=false }
local opts2 = { focusable = false,
close_events = { "BufLeave", "CursorMoved", "InsertEnter", "FocusLost" },
border = 'rounded',
source = 'always', -- show source in diagnostic popup window
prefix = ' '}
buf_set_keymap('n', 'gD', '<Cmd>lua vim.lsp.buf.declaration()<CR>', opts)
buf_set_keymap('n', 'gd', '<Cmd>tab split | lua vim.lsp.buf.definition()<CR>', opts)
buf_set_keymap('n', 'K', '<Cmd>lua vim.lsp.buf.hover()<CR>', opts)
buf_set_keymap('n', 'gi', '<cmd>lua vim.lsp.buf.implementation()<CR>', opts)
buf_set_keymap('n', '<leader>t', '<cmd>lua vim.lsp.buf.signature_help()<CR>', opts)
buf_set_keymap('n', '<leader>rn', '<cmd>lua vim.lsp.buf.rename()<CR>', opts)
buf_set_keymap('n', 'gr', '<cmd>lua vim.lsp.buf.references()<CR>', opts)
buf_set_keymap('n', '<leader>e', '<cmd>lua vim.diagnostic.open_float(0, {{opts2}, scope="line", border="rounded"})<CR>', opts)
buf_set_keymap('n', '[d', '<cmd>lua vim.diagnostic.goto_prev({ float = { border = "rounded" }})<CR>', opts)
buf_set_keymap('n', ']d', '<cmd>lua vim.diagnostic.goto_next({ float = { border = "rounded" }})<CR>', opts)
buf_set_keymap("n", "<leader>q", "<cmd>lua vim.diagnostic.setloclist({open = true})<CR>", opts)
-- Set some keybinds conditional on server capabilities
if client.resolved_capabilities.document_formatting then
buf_set_keymap("n", "<leader>lf", "<cmd>lua vim.lsp.buf.formatting()<CR>", opts)
end
if client.resolved_capabilities.document_range_formatting then
buf_set_keymap("n", "<leader>lf", "<cmd>lua vim.lsp.buf.formatting()<CR>", opts)
end
end
-- NOTE: Don't use more than 1 servers otherwise nvim is unstable
local capabilities = vim.lsp.protocol.make_client_capabilities()
capabilities = require('cmp_nvim_lsp').update_capabilities(capabilities)
capabilities.textDocument.completion.completionItem.snippetSupport = true
-- Use pylsp
nvim_lsp.pylsp.setup({
on_attach = on_attach,
settings = {
pylsp = {
plugins = {
pylint = { enabled = true, executable = "pylint" },
pyflakes = { enabled = true },
pycodestyle = { enabled = false },
jedi_completion = { fuzzy = true },
pyls_isort = { enabled = true },
pylsp_mypy = { enabled = true },
},
}, },
flags = {
debounce_text_changes = 200,
},
capabilities = capabilities,
})
-- Use pyright or jedi_language_server
--local servers = {'jedi_language_server'}
--local servers = {'pyright'}
--for _, lsp in ipairs(servers) do
--nvim_lsp[lsp].setup({
-- on_attach = on_attach,
-- capabilities = capabilities
--})
--end
-- Change diagnostic signs.
vim.fn.sign_define("DiagnosticSignError", { text = "✗", texthl = "DiagnosticSignError" })
vim.fn.sign_define("DiagnosticSignWarn", { text = "!", texthl = "DiagnosticSignWarn" })
vim.fn.sign_define("DiagnosticSignInformation", { text = "", texthl = "DiagnosticSignInfo" })
vim.fn.sign_define("DiagnosticSignHint", { text = "", texthl = "DiagnosticSignHint" })
-- global config for diagnostic
vim.diagnostic.config({
underline = false,
virtual_text = true,
signs = true,
severity_sort = true,
})
-- Change border of documentation hover window, See https://github.com/neovim/neovim/pull/13998.
vim.lsp.handlers["textDocument/hover"] = vim.lsp.with(vim.lsp.handlers.hover, {
border = "rounded",
})
This one is a big lengthy, and I took many parts from jdhao’s config, and eduardoarandah’s config with some of my own tweaks. Not every part is necessary, many lines are actually appearance tweaks that you can safely discard.
It took me a while to get my head around what’s really going on with the LSP business. Here are the key components and what each one does:
- LSP: the standard.
- nvim-lspconfig: the Neovim LSP client that communicates with a server of a language, conforming with the LSP standard.
- The language server: e.g. pyright for Python, or clangd for c, the server engine that parses the codes and provides the functionalities such as linting and searching. One language may have multiple different servers, e.g. pyslp and jedi-language-server are both Python servers, besides pyright.
- The auto-completion engine: this is yet another independent component in the entire tool chain, but it’s so often used with all the above I mistook it as part of nvim-lspconfig initially. Again, there are more than one auto-completion engines, such as nvim-cmp (talked in later section), nvim-compe (now deprecated), completion-nvim (no longer maintained), and coq_nvim.
So, the essential steps one needs to do to setup LSP for Python:
- Pick one language server and install in the OS, outside of
Neovim. E.g.
npm install -g pyrightfor pyright,pip install 'python-lsp-server[all]'for pyslp, orpip install jedi-language-serverfor jedi-language-server. - Install the nvim-lspconfig plugin in Neovim.
- Add the language server in Step 1 to Neovim’s config: e.g.
require'lspconfig'.pyright.setup{}. - Optionally add additional configs inside the
setup{}brackets as above shown. - Open and edit a Python script file and watch the LSP tools
function, e.g. Figure 3 below demonstrates the hover function
(bound to
Shift-Khotkey) in action, and Figure 4 shows the diagnostics from pylsp on one of my Python scripts (I consider myself a free-form programmer).
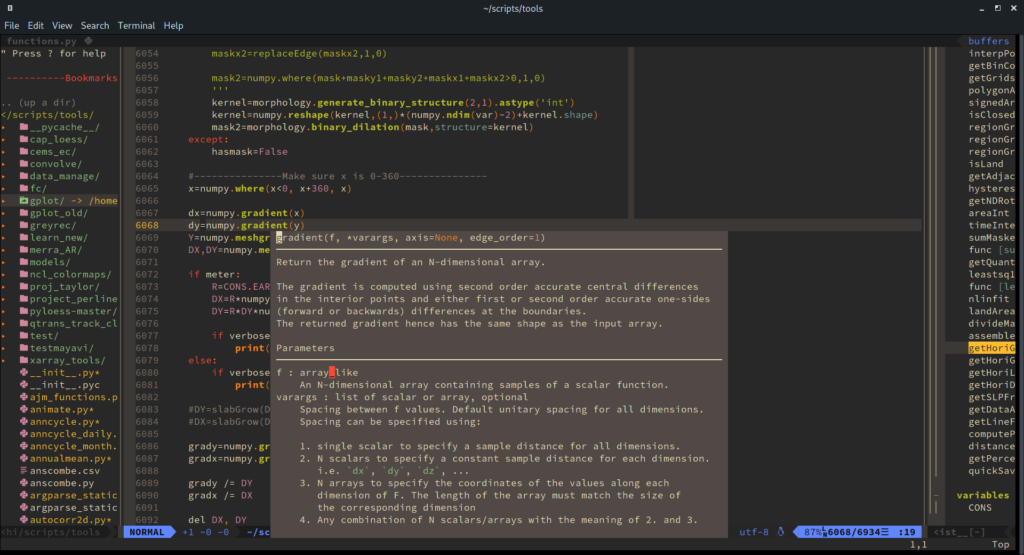

hover function using LSP and pyslp server.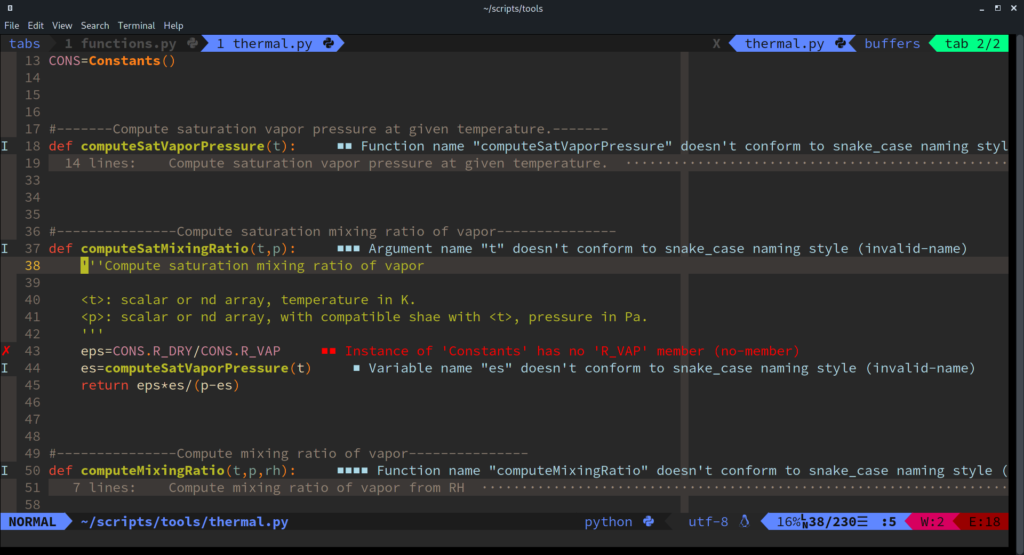

nvim-cmp
As alluded to above, nvim-cmp is one auto-completion engine for Vim/Neovim, among many other alternatives (e.g. nvim-compe, completion-nvim (both deprecated) and coq_nvim). It seems to be the go-to choice nowadays, so I picked this one.
Again, I found it helpful to first get some concepts/terminologies straight (this is one of the obstacles I noticed that may hinder a smooth transition into Neovim).
- nvim-cmp: the auto-completion engine, which collects potential completion strings depending on the context, and interacts with the user with a pop-up menu populated with completions, as well as responses to user inputs like completion selection/abortion/scrolling key strokes.
- completion source: where to look for all those potential
completions. Here are a few common sources:
buffer: literal words appeared in the current (default) or all opened Vim/Neovim buffers (needs config). This is provided by the'hrsh7th/cmp-buffer'plugin.path: file name completion, provided by the'hrsh7th/cmp-path'plugin.cmdline: Vim/Neovim command completion, when you type in the command mode. This is provided by the'hrsh7th/cmp-cmdline'plugin.nvim_lsp: keywords completion provided by the language server in the LSP framework we talked about above. This is supported by the'hrsh7th/cmp-nvim-lsp'plugin.- snippets: again, multiple choices are available. For vim-vsnip one
needs the
'hrsh7th/cmp-vsnip'plugin (aside from vim-vsnip itself). For luasnip one needs additionally the'saadparwaiz1/cmp_luasnip'plugin. For Ultisnips, one may choose to install a collection of default snippets from the'honza/vim-snippets'and/or'quangnguyen30192/cmp-nvim-ultisnips'plugins.
So, the auto-completion engine itself, and those different sources form a kind of client-server relationship, and each source is handled by a separate plugin. This is a bit complicated design choice but I guess it serves modular development better.
Figure 5 below shows the auto-completion function as a small pop-up window, after I typed numpy.lin.
With the basic concepts clarified, the plugins I install for the nvim-cmp tool chain:
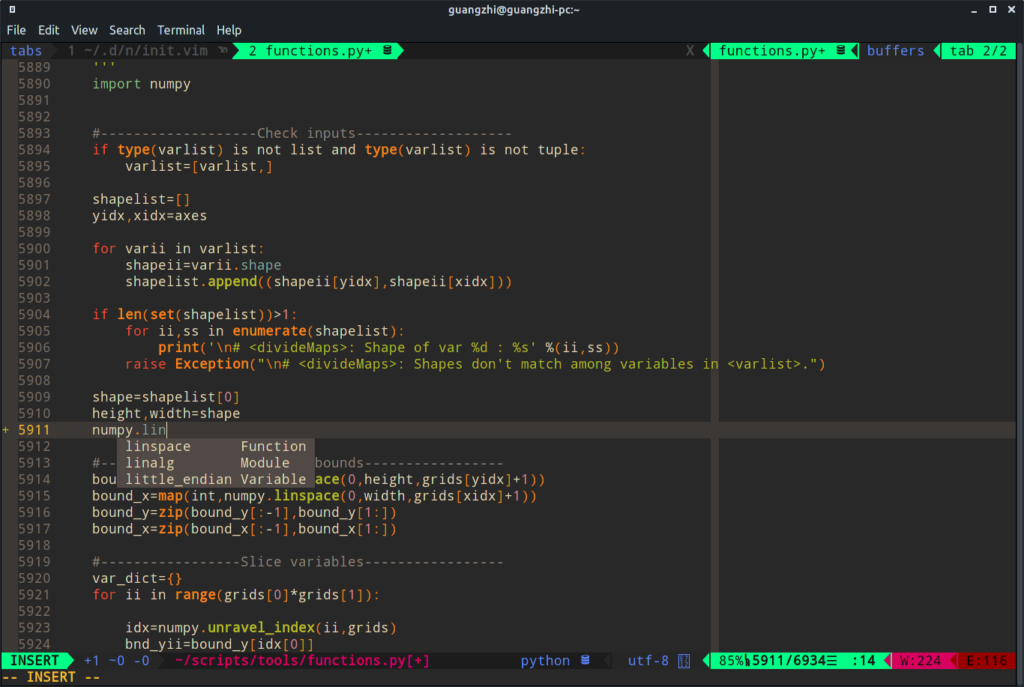

nvim-cmp triggered at line 5911." nvim-cmp {
Plug 'hrsh7th/cmp-nvim-lsp'
Plug 'hrsh7th/cmp-buffer'
Plug 'hrsh7th/cmp-path'
Plug 'hrsh7th/cmp-cmdline'
Plug 'hrsh7th/nvim-cmp'
" nvim-cmp }
" snippet engine
Plug 'SirVer/ultisnips'
" default snippets
Plug 'honza/vim-snippets', {'rtp': '.'}
Plug 'quangnguyen30192/cmp-nvim-ultisnips', {'rtp': '.'}
So I choose to use the UltiSnips snippet engine, one I also use for Vim.
The nvim-cmp configs:
lua <<EOF
local cmp = require('cmp')
local ultisnips_mappings = require("cmp_nvim_ultisnips.mappings")

cmp.setup({
    snippet = {
      -- REQUIRED - you must specify a snippet engine
      expand = function(args)
        -- vim.fn["vsnip#anonymous"](args.body) -- For `vsnip` users.
        -- require('luasnip').lsp_expand(args.body) -- For `luasnip` users.
        -- require('snippy').expand_snippet(args.body) -- For `snippy` users.
        vim.fn["UltiSnips#Anon"](args.body) -- For `ultisnips` users.
      end,
    },

    mapping = {
      ["<Tab>"] = cmp.mapping(function(fallback)
          if cmp.visible() then
              cmp.select_next_item()
          else
              ultisnips_mappings.expand_or_jump_forwards(fallback)
          end
        end),

      ["<S-Tab>"] = function(fallback)
          if cmp.visible() then
              cmp.select_prev_item()
          else
              ultisnips_mappings.expand_or_jump_backwards(fallback)
          end
        end,

      ["<C-j>"] = cmp.mapping(function(fallback)
          ultisnips_mappings.expand_or_jump_forwards(fallback)
        end),

      ['<C-b>'] = cmp.mapping(cmp.mapping.scroll_docs(-4), { 'i', 'c' }),
      ['<C-f>'] = cmp.mapping(cmp.mapping.scroll_docs(4), { 'i', 'c' }),
      ['<C-g>'] = cmp.mapping({i = cmp.mapping.abort(), c = cmp.mapping.close()}),
      ['<CR>'] = cmp.mapping.confirm({ select = false }), -- Accept currently selected item. Set `select` to `false` to only confirm explicitly selected items.
    },

    sources = cmp.config.sources({
      { name = 'nvim_lsp' },
      { name = 'ultisnips' }, -- For ultisnips users.
      }, {
      { name = 'path' },
      { name = 'buffer', keyword_length = 2,
        option = {
            -- include all buffers
            get_bufnrs = function()
             return vim.api.nvim_list_bufs()
            end

            -- include all buffers, avoid indexing big files
            -- get_bufnrs = function()
              -- local buf = vim.api.nvim_get_current_buf()
              -- local byte_size = vim.api.nvim_buf_get_offset(buf, vim.api.nvim_buf_line_count(buf))
              -- if byte_size > 1024 * 1024 then -- 1 Megabyte max
                -- return {}
              -- end
              -- return { buf }
            -- end
      }},  -- end of buffer
    }),

    completion = {
        keyword_length = 2,
        completeopt = "menu,noselect"
  },
})

-- Use buffer source for `/` (if you enabled `native_menu`, this won't work anymore).
cmp.setup.cmdline('/', {
    sources = {
      { name = 'buffer' },
    },
})

-- Use cmdline & path source for ':' (if you enabled `native_menu`, this won't work anymore).
cmp.setup.cmdline(':', {
    sources = cmp.config.sources({
      { name = 'path' }
    }, {
      { name = 'cmdline' },
    }),
})
EOF
Again, these are largely copied and modded from the suggested config by nvim-cmp.
A few things worth mentioning:
-
The
<Tab>and<S-Tab>keys bound in this manner will prioritize nvim-cmp completions over UltiSnips triggering. If keywords from neither sources are available, it will just fall back to a normal<Tab>or<S-Tab>. -
In
['<CR>'] = cmp.mapping.confirm({ select = false }), theselect = falseoption allows me to input a literal substring when longer matchings are found. Example: I type the lettersmapwithout a trailing space, and this triggers these possible completions:mapping,mappingsandmapping_dict. Hitting<Tab>now will cycle through these 3 choices, but I actually only want to inputmap. Withselect = false, hitting Enter allows me to abort the completion and inputmap. Withselect = true, hitting Enter will trigger a completion with the current highlighted candidate inserted, e.g.mapping. I found this behavior a bit annoying because it makes inputting short strings slightly more difficult. -
The
sources = cmp.config.sources({...})part lists all the sources I want the completion engine to search for. Note that I have to include the{ name = 'nvim_lsp' }table for nvim-cmp to work with all the LSP stuff we set up earlier. -
By default, the
buffersource only looks for words/strings appearing in the current buffer. To collect completions from all opened buffers, some extra configs are needed. Remember that each source is supported in a separate plugin, these settings are not given in the documentation of nvim-cmp, but in the cmp-buffer plugin. -
The
keyword_length = 2option set tobufferandcompletion(relevant for all sources) triggers completion pop-up only after I’ve typed 2 or more letters. The default number is1, and I found that a bit too proactive.
Some other things worth mentioning
The above has covered the major parts of the Neovim config that is different from my previous Vim configs, and at the same time the relatively new features of Neovim. There are a few other points that I think might be worth mentioning:
- The telescope plugin: A fuzzy-finder that searches for files, git-tracked files, grep strings, buffer strings etc.. This seems to be another hot-spot within the Neovim ecosystem. Figure 6 below shows the telescope file fuzzy finder with a preview window shown in a floating window (which is unique to Neovim and not available in Vim).
- The vim-expand-region plugin doesn’t seem to work in Neovim.
- There is a vim-highlightedyank plugin that highlights the newly yanked texts for a short amount of time. This functionality can now be achieved in Neovim without using plugin, by using these 4 lines of vimscript (from this reddit discussion):
augroup highlight_yank
    autocmd!
    au TextYankPost * silent! lua vim.highlight.on_yank { higroup='IncSearch', timeout=400 }
augroup END
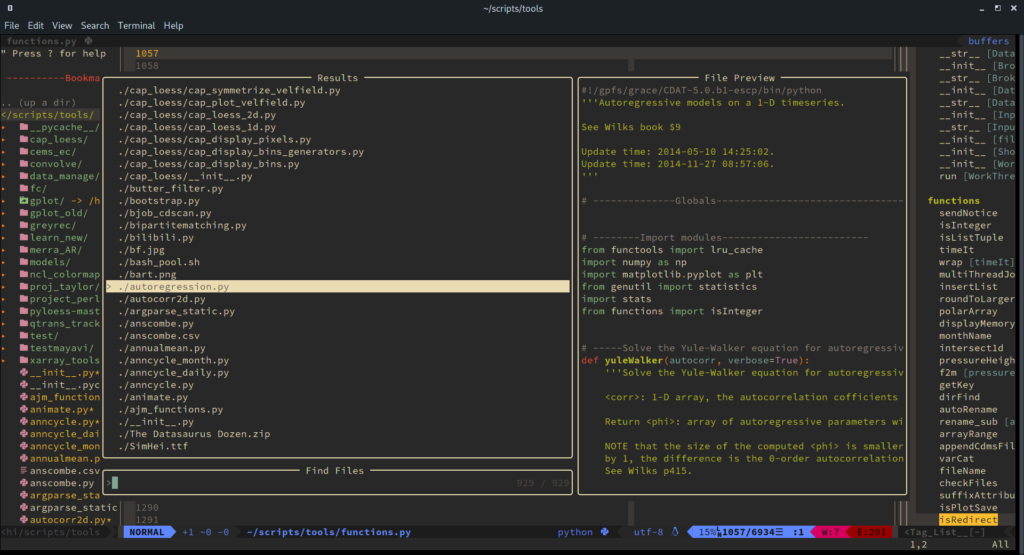

Potential pitfalls and trouble-shooting
I ran into these pitfalls when setting up Neovim:
The LSP server installed via nvim-lsp-installer not fully functioning
Problem
I came across this williamboman/nvim-lsp-installer plugin which is a helper utility that provides the user with a graphical interface to manage various LSP language servers. I thought it is a nice touch, particularly for someone new to the LSP system, so I installed it, and used it to install the Python servers.
However, this turns out to be causing a number of issues that eventually cost me about 2 days to solve.
Firstly, I noticed that the pyright server I installed outside Neovim, using npm install -g pyright was not recognized by nvim-lsp-installer. I should have been alerted by then, but instead went on to install jedi-language-server and pyslp using nvim-lsp-installer.
This, compounded with my unfamiliarity with all the LSP configs, somehow created more than 1 language servers running at the same time. As a result, the tab-switching hotkeys (gt and gT in normal mode) frequently froze my Neovim completely, so that I had to kill the terminal window to get rid of that dead process.
I initially blamed nvim-cmp for that and attempted to use other completion engines instead. But apparently that was the wrong place to look.
Another issue is that the go-to-definition functionality provided by the language server installed using nvim-lsp-installer only works for definitions in the same file, for some reason. Beyond that it just doesn’t do anything for definitions in other modules. I tried pyright, pylsp and jedi-language-server and they all behaved like this.
Solution
I consulted someone in the Telegram Vim User Group, and was advised to install servers myself and remove nvim-lsp-installer. And all the above problems are gone.
Problem
I noticed that Neovim does not show me any help tags for the plugins I
installed using vim-plug, for instance, running :help lspconfig finds nothing.
The faq page of vim-plug states:
Does vim-plug generate help tags for my plugins?
Yes, it automatically generates help tags for all of your plugins whenever you run PlugInstall or PlugUpdate. But you can regenerate help tags only with plug#helptags() function.
Solution
But apparently for some reason it didn’t do that for me. So I
added plug#helptags() after plug#end(), then problem solved.
Python indentation not working well with tree-sitter
Problem
I initially enabled the indent module of tree-sitter, and noticed
that it did not indent the Python code correctly. In particular,
automatic indentation after a : is wrong. I tried to mess with the
values of tabstop, softtabstop, expandtab and shiftwidth, but
in vain.
Solution
Disable indent module in tree-sitter by putting these inside the
curly bracket of the line require'nvim-treesitter.configs'.setup {}:
indent = {
  enable = false,
  disable = {},
},
I also use these following (just for good measure):
filetype plugin indent on
set tabstop=4 softtabstop=4 expandtab shiftwidth=4
In the nvim-treesitter Github page, it is stated that indentation:
NOTE: This is an experimental feature.
So I guess we have to wait for this to stabilize.
nvim-cmp completion does not pick up words from other buffers
Problem
The buffer source by default does not pick up
words from other opened buffers for nvim-cmp auto-completion.
Solution
To enable this one has to change the get_bufnrs function, as
instructed in the cmp-buffer Github README:
get_bufnrs = function()
  return vim.api.nvim_list_bufs()
end
I think this should be the default behavior instead.
Some thoughts about my Vim-Neovim migration experience
It took a lot longer than I initially expected
With some previous experiences of Vim tinkering, I anticipated the Neovim migration to be a fairly straightforward search-paste-go process. It would have been the case if I chose to use all the old configs and plugins. But since I decided to try the new features that are relatively recent, I went into some pitfalls which cost me quite a while to debug.
Confusions created by the lua+vimscript combination
Vimscript has been notoriously cryptic. With absolutely no former experience, lua is hardly any better for me. And the combined usages of both often found in many online resources add yet another layer of complexity.
I also found that if you embed lua snippets inside the
init.vim file and make some mistake with the lua code, the error
message will not give the line number relative to the init.vim file,
but relative to the lua snippet. So you may want to turn on relative
line numbering to help locate the error.
Fast evolving ecosystem
This one is mostly about auto-completion. I found in several blog posts instructions on setting up nvim-compe or completion-nvim as the auto-completion engine. But when I went to their Github pages, it is said that those are no longer maintained. Then I was faced with the two choices:
- follow along the blog instructions and use a no longer maintained plugin, or
- search for a different tutorial that uses a still maintained alternative.
The former one seems a bit more risky to me, considering how fast the entire ecosystem is evolving. But the latter one would imply more researching time. Plus, it is really difficult for a new user to actually tell the improvements, or differences at all, from all those alternative implementations.
I think this is the inevitable price one has to pay for using an actively developed project like Neovim. And I’m not sure what would be the ideal way of alleviating such a problem. I hope my sharing of experience could do a bit of good in this regard.
More difficult to configure
I think this one is related to the above 2 points regarding lua configurations and the ecosystem. I feel that for some plugins at least, notably lspconfig and nvim-cmp, Neovim is more difficult to configure. Look at those long lines of lua code. I feel that this is doing more of a lower level hacking much like in the suckless manner, rather than higher level parameter tuning. I’m myself no lua user nor plugin developer so I’m certainly biased, but from a new user’s point of view, these are really scary configurations. And I’m not sure this is making Neovim more "modern", as it is envisioned to be (or maybe this is the new "modern"), or more primitive, even more so than its predecessor Vim.
Also, I feel that many plugins seem to lack more intuitive, plain-language descriptions in their documentation. As talked above, the entire tool chain of LSP and nvim-cmp is kind of convoluted. Terms like "language servers", "capabilities" (I still don’t know that this means), "completion sources" without further and easier explanations make me feel that these are designed for Neovim developers, rather than end users. As a result, I had a hard time trying to figure out what parts I actually need to set up the LSP/completion thing. In this regard, I found blog posts and Youtube tutorials to be more helpful, at least for a newcomer.
Useful references and resources
Youtube videos:
- Vim vs NeoVim, What’s the Difference? Which Should You Use?
- Neovim Vs Vim: What’s The Difference in 2020
- Neovim – Telescope: a highly extendable fuzzy finder
Github pages:
- nvim-treesitter Github page
- vim-plug Github page
- vim-plug Github issue page
- jdhao’s config
- eduardoarandah’s config
- telescope Github page
Telegram group:


