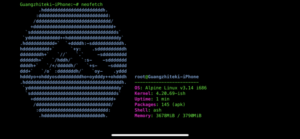
The final outcome
In this post I would like to show you how to create a quick and easy dictionary look-up tool in a Linux desktop. One picture speaks a thousand words. To illustrate what we are trying to achieve, it would be better to first show the final outcome. See the video clip below:
In the beginning I invoke the "program" by pressing the Win + T
key combination. The choice of key combination is totally arbitrary,
and the shortcut is defined using the "custom keyboard shortcut"
tool in the cinnamon desktop. How to define custom shortcuts is
desktop environment dependent (if you are not familiar with the
difference between a Linux distro and a desktop environment (DE),
there are some relevant information in this post), so I’m not showing
this process here.
A GUI window then shows up (see Figure 1 below) that prompts me to enter a word to search.

rofi prompt window.After typing in the word "professor" and hitting Enter, a new window
shows up giving me the definition from the dictionary of "牛津英汉双解
美化版". At the top of the new window there is another prompt
dmenu:, into which I type in another word "lobster" followed by
Enter. This triggers a new look-up. The same process then
repeats. For instance, typing in the 3rd word "meaning" performs
another dictionary query. At any time, I can hit the Enter or Esc
key to quit the loop.
Build the tool
Now let’s work out the process to build such a tool from scratch.
"sdcv": the dictionary
Firstly, the actual dictionary program used is called sdcv, which is short for StarDict under Console Version. It is recommended to install sdcv using the distro’s package manager. E.g. I’m using manjaro Linux whose package manager is pacman, therefore it can be installed using
pacman -S sdcv
For Debian or Ubuntu distros that use apt-get:
apt-get install -y sdcv
sdcv is just a command-line interface to the dictionaries in the
StarDict format. To perform looks-up, one also needs to download the
dictionaries themselves. There are a number of dictionaries in
this site, which also gives the instructions on how to install the
downloaded dictionaries. For instance, on a Linux system, the
installation is simply unpacking the downloaded dictionary file and
moving the resultant folder into the directory
/usr/share/stardict/dic/. Figure 2 below shows the contents in the
directory of /usr/share/stardict/dic/ in my system. There are 2
dictionaries on my system: stardict-longman-2.4.2 and
stardict-oxford-gb-formated-2.4.2.
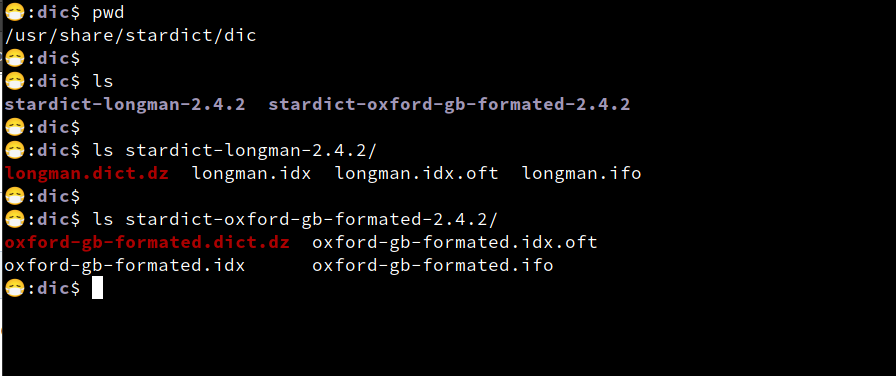
sdcv dictionary storage location. To use sdcv, open up a terminal window and execute sdcv. It will
prompt you for a word to look-up. See screenshot in Figure 3.
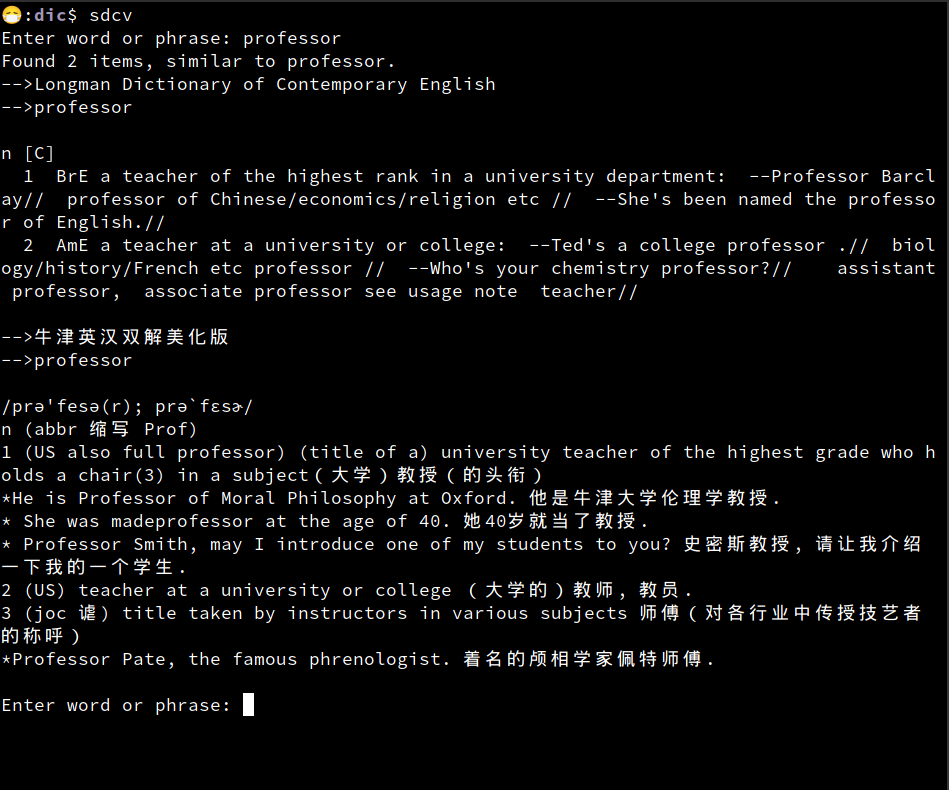
sdcv session.If it finds the target word, translations will be printed out to the terminal window, then it puts you back to the prompt again.
One can provide the target word directly to sdcv using the -n option:
sdcv -n 'professor'
Or, specify a dictionary to look-up, e.g.
sdcv -u '牛津英汉双解美化版' -n 'professor'
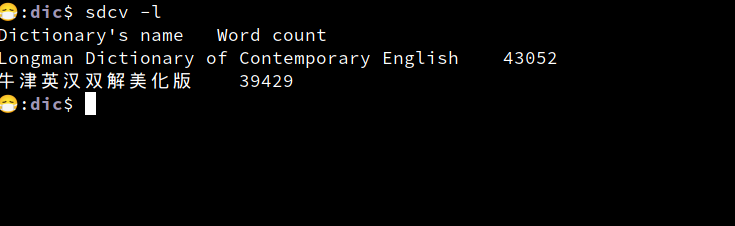
The name of the dictionary can be viewed using the sdcv -l command,
which also gives the number of words in the dictionary. See Figure 4
for an example.
sdcv -l command.More information on sdcv can be found in this page.
"rofi": the interface software
We have set up sdcv as the dictionary tool that accepts a query and
returns the looked-up contents. So in some sense sdcv can be viewed as
the "back-end". The "front-end" of choice is rofi, a window switcher
and application launcher tool. More specifically, we use the dmenu mode
of rofi to provide a user interface.
As a side note, dmenu itself is another application launcher similar
to rofi but more lighter-weight. As rofi can be used as a drop-in
replacement of dmenu, what I describe below is applicable to both.
You can "pipe" in arbitrary contents in the form of a list into
dmenu/rofi and let it display the list in a pop-up interface. You can
navigate through the list items, and get the selected item as the
return value if you press Enter on any of them. This makes dmenu a
rather versatile tool that can be used as a building block to create
some customized utilities or workflows. For instance, we can pipe the
outputs from the ls command into dmenu to let it display the
contents in a folder. The return value from rofi is just the
selected folder/file name. You can then script this behavior into a
file/folder picker tool. Below is the bash script I use to display all
the org-mode note files in a specific folder using rofi -dmenu:
org_folder=~/Notebooks/org/
selected=$(find "$org_folder" -name "*.org" | sort | rofi -dmenu) && emacs "${selected}"
The note files are those within the ~/Notebooks/org/ directory, with
a .org extension. A list of these files can be obtained using the
find command, the outputs of which are then piped into the sort
command to sort the file names in alphabetic order. The sorted list is
then piped into rofi, using the -dmenu option. All these are put
inside $(), which is the command substitution syntax in bash
scripting (a cheat sheet of bash scripting can be found here). After I
made a selection from the list provided by rofi, the return value is
then assigned to the selected variable, which is then used in the
2nd command emacs "${selected}" that is chained up with the
preceding part using &&. Therefore, the part after
&& is only executed when the command before && was executed
successfully.
Back to our dictionary tool. What we’d like to achieve
is to let rofi open up a prompt for us to type in the word to look
up. This can be done using the -p option, like so:
rofi -dmenu -p 'Type in the word to search:'
See the video clip below for a screen cast:
rofi with sdcv.After executing the above command, rofi returns the word we typed
in the pop-up window as stdout and prints it out to the terminal. We
can use command substitution to catch the return value, and put it into
sdcv to perform the look-up:
QUERY=$(rofi -dmenu -p 'Type in the word to search:') && sdcv -n "$QUERY"
See Figure 5 below for a screenshot of this process:
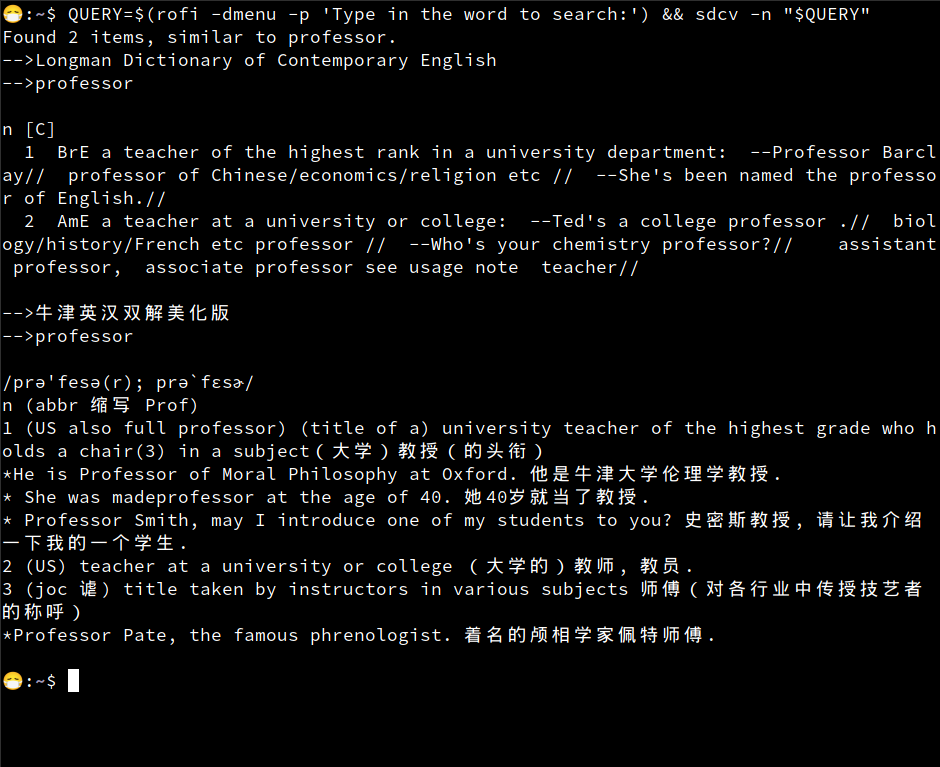
rofi and sdcv in combination.Remember that the looked-up contents from sdcv are printed as
stdout to the terminal, so to show the contents in a rofi window
instead, just pipe that into rofi again:
QUERY=$(rofi -dmenu -p 'Type in the word to search:') && sdcv -n "$QUERY" | rofi -dmenu
We are almost there. The next step would be to keep the rofi interface
open and keep on accepting subsequent queries. To do this we use a while loop
in a bash script, like so:
#!/bin/bash

function lookup() {
	short=${2:-y}
	if [[ $short = y ]]; then
		ans=$(sdcv -u '牛津英汉双解美化版' -n "$1")
	else
		ans=$(sdcv -n "$1")
	fi
	echo "$ans"
}

QUERY=$(rofi -dmenu -p 'Type in the word to search:')

while [[ -n $QUERY ]]; do
	trans=$(lookup "$QUERY" 'y')
	# get new search
	QUERY=$(echo "$trans" | rofi -dmenu -format f)
done
We first defined a bash function named lookup. More information
regarding function definition in bash scripting can be found
here. Note that in bash scripting, the argument list inside the
parentheses after the function name is always empty: lookup(). To
access the input arguments, one uses $1 for the 1st argument, $2
for the 2nd one, etc.. The ${2:-y} part is defining a default value
for the 2nd input argument such that if only 1 argument is assigned to
the function call, the 2nd argument would have a value of y.
This optional 2nd argument is used to specify which dictionary to
use. If $short$ gets assigned a value of y, then use the ‘牛津英汉
双解美化版’ dictionary, otherwise do not specify the dictionary choice.
Bash functions can only return an integer as return
values. However, in this case we want our lookup function to return
the translations as texts. To achieve this, we echo out the obtained
contents: echo "$ans", so that the contents can be captured using a
command substitution:
trans=$(lookup "$QUERY" 'y')
Note that here we are explicitly providing the 2nd input argument
'y' into lookup.
Remember that trans now contains the looked-up translations of the
word stored in $QUERY, but have not been displayed
anywhere yet. To do that, we echo out "$trans" and pipe that into
rofi again:
QUERY=$(echo "$trans" | rofi -dmenu -format f)
Note that we are using the -format f option of rofi this time. This
is to let rofi return the contents the user typed in at the prompt,
rather than the list item from user selection, such that we can keep
on typing in new words to look up. This returned new word is saved
into the $QUERY$ variable, and if it is not an empty string, the
while loop repeats.
Customize the interface
The default rofi window is rather small (see, for instance, Video
1). It would be nicer to use a larger window to display more contents
so that we don’t need to scroll down frequently. To
customize the rofi window, one uses the -config option to specify
a configuration file, like so:
QUERY=$(echo "$trans" | rofi -dmenu -config ~/.config/rofi/my_config -format f)
Below is the contents in my_config:
rofi.theme: ./Arc-Dark.rasi

! "Enabled modi" Set from: Default
! rofi.modi:                           window,run,ssh
! "Window width" Set from: Default
rofi.width:                          70
! "Number of lines" Set from: Default
rofi.lines:                          35
! "Number of columns" Set from: Default
! rofi.columns:                        1
! "Font to use" Set from: Default
rofi.font:                           mono 11
! "Border width" Set from: Default
! rofi.bw:                             1
! "Location on screen" Set from: Default
rofi.location:                       2
! "Padding" Set from: Default
rofi.padding:                        0
! "Y-offset relative to location" Set from: Default
rofi.yoffset:                        10
! "X-offset relative to location" Set from: Default
! rofi.xoffset:                        0
! "Always show number of lines" Set from: Default
rofi.fixed-num-lines:                true
! "Whether to load and show icons" Set from: Default
! rofi.show-icons:                     false
! "Terminal to use" Set from: Default
! rofi.terminal:                       rofi-sensible-terminal
! "Ssh client to use" Set from: Default
! rofi.ssh-client:                     ssh
! "Ssh command to execute" Set from: Default
! rofi.ssh-command:                    {terminal} -e {ssh-client} {host}
! "Run command to execute" Set from: Default
! rofi.run-command:                    {cmd}
! "Command to get extra run targets" Set from: Default
! rofi.run-list-command:
! "Run command to execute that runs in shell" Set from: Default
! rofi.run-shell-command:              {terminal} -e {cmd}
! "Command executed on accep-entry-custom for window modus" Set from: Default
! rofi.window-command:                 xkill -id {window}
! "Window fields to match in window mode" Set from: Default
! rofi.window-match-fields:            all
! "Theme to use to look for icons" Set from: Default
! rofi.drun-icon-theme:
! "Desktop entry fields to match in drun" Set from: Default
! rofi.drun-match-fields:              name,generic,exec,categories
! "Disable history in run/ssh" Set from: Default
! rofi.disable-history:                false
! "Use sorting" Set from: Default
! rofi.sort:                           false
! "Use levenshtein sorting also for fuzzy matching" Set from: Default
! rofi.levenshtein-sort:               false
! "Set case-sensitivity" Set from: Default
! rofi.case-sensitive:                 false
! "Cycle through the results list" Set from: Default
! rofi.cycle:                          true
! "Enable sidebar-mode" Set from: Default
! rofi.sidebar-mode:                   false
! "Row height (in chars)" Set from: Default
! rofi.eh:                             1
! "Enable auto select mode" Set from: Default
! rofi.auto-select:                    false
! "Parse hosts file for ssh mode" Set from: Default
! rofi.parse-hosts:                    false
! "Parse known_hosts file for ssh mode" Set from: Default
! rofi.parse-known-hosts:              true
! "Set the modi to combine in combi mode" Set from: Default
! rofi.combi-modi:                     window,run
! "Set the matching algorithm. (normal, regex, glob, fuzzy)" Set from: Default
! rofi.matching:                       normal
! "Tokenize input string" Set from: Default
! rofi.tokenize:                       true
! "Monitor id to show on" Set from: Default
! rofi.m:                              -5
! "Margin between rows *DEPRECATED*" Set from: Default
! rofi.line-margin:                    2
! "Padding within rows *DEPRECATED*" Set from: Default
! rofi.line-padding:                   1
! "Pre-set filter" Set from: Default
! rofi.filter:
! "Separator style (none, dash, solid) *DEPRECATED*" Set from: Default
! rofi.separator-style:                dash
! "Hide scroll-bar *DEPRECATED*" Set from: Default
! rofi.hide-scrollbar:                 false
! "Fullscreen" Set from: Default
! rofi.fullscreen:                     false
! "Fake transparency *DEPRECATED*" Set from: Default
! rofi.fake-transparency:              false
! "DPI" Set from: Default
! rofi.dpi:                            -1
! "Threads to use for string matching" Set from: Default
! rofi.threads:                        0
! "Scrollbar width *DEPRECATED*" Set from: Default
! rofi.scrollbar-width:                8
! "Scrolling method. (0: Page, 1: Centered)" Set from: Default
! rofi.scroll-method:                  0
! "Background to use for fake transparency. (background or screenshot)" Set from: Default
! rofi.fake-background:                screenshot
! "Window Format. w (desktop name), t (title), n (name), r (role), c (class) *DEPRECATED*" Set from: Default
! rofi.window-format:                  {w}    {i}{c}   {t}
! "Click outside the window to exit" Set from: Default
! rofi.click-to-exit:                  true
! "Indicate how it match by underlining it." Set from: Default
! rofi.show-match:                     true
! "New style theme file" Set from: File
!rofi.theme:                          /usr/share/rofi/themes/Arc-Dark.rasi
! "Color scheme for normal row" Set from: Default
! rofi.color-normal:
! "Color scheme for urgent row" Set from: Default
! rofi.color-urgent:
! "Color scheme for active row" Set from: Default
! rofi.color-active:
! "Color scheme window" Set from: Default
! rofi.color-window:
! "Max history size (WARNING: can cause slowdowns when set to high)." Set from: Default
! rofi.max-history-size:               25
! "Hide the prefix mode prefix on the combi view." Set from: Default
! rofi.combi-hide-mode-prefix:         false
! "Pidfile location" Set from: Default
! rofi.pid:                            /run/user/1000/rofi.pid
! "The display name of this browser" Set from: Default
! rofi.display-window:
! "The display name of this browser" Set from: Default
! rofi.display-windowcd:
! "The display name of this browser" Set from: Default
! rofi.display-run:
! "The display name of this browser" Set from: Default
! rofi.display-ssh:
! "The display name of this browser" Set from: Default
! rofi.display-drun:
! "The display name of this browser" Set from: Default
! rofi.display-combi:
! "The display name of this browser" Set from: Default
! rofi.display-keys:
! "Paste primary selection" Set from: Default
! rofi.kb-primary-paste:               Control+V,Shift+Insert
! "Paste clipboard" Set from: Default
! rofi.kb-secondary-paste:             Control+v,Insert
! "Clear input line" Set from: Default
! rofi.kb-clear-line:                  Control+w
! "Beginning of line" Set from: Default
! rofi.kb-move-front:                  Control+a
! "End of line" Set from: Default
! rofi.kb-move-end:                    Control+e
! "Move back one word" Set from: Default
! rofi.kb-move-word-back:              Alt+b
! "Move forward one word" Set from: Default
! rofi.kb-move-word-forward:           Alt+f
! "Move back one char" Set from: Default
! rofi.kb-move-char-back:              Left,Control+b
! "Move forward one char" Set from: Default
! rofi.kb-move-char-forward:           Right,Control+f
! "Delete previous word" Set from: Default
! rofi.kb-remove-word-back:            Control+Alt+h,Control+BackSpace
! "Delete next word" Set from: Default
! rofi.kb-remove-word-forward:         Control+Alt+d
! "Delete next char" Set from: Default
! rofi.kb-remove-char-forward:         Delete,Control+d
! "Delete previous char" Set from: Default
! rofi.kb-remove-char-back:            BackSpace,Control+h
! "Delete till the end of line" Set from: Default
! rofi.kb-remove-to-eol:               Control+k
! "Delete till the start of line" Set from: Default
! rofi.kb-remove-to-sol:               Control+u
! "Accept entry" Set from: Default
! rofi.kb-accept-entry:                Control+j,Control+m,Return,KP_Enter
! "Use entered text as command (in ssh/run modi)" Set from: Default
! rofi.kb-accept-custom:               Control+Return
! "Use alternate accept command." Set from: Default
! rofi.kb-accept-alt:                  Shift+Return
! "Delete entry from history" Set from: Default
! rofi.kb-delete-entry:                Shift+Delete
! "Switch to the next mode." Set from: Default
! rofi.kb-mode-next:                   Shift+Right,Control+Tab
! "Switch to the previous mode." Set from: Default
! rofi.kb-mode-previous:               Shift+Left,Control+ISO_Left_Tab
! "Go to the previous column" Set from: Default
! rofi.kb-row-left:                    Control+Page_Up
! "Go to the next column" Set from: Default
! rofi.kb-row-right:                   Control+Page_Down
! "Select previous entry" Set from: Default
! rofi.kb-row-up:                      Up,Control+p,ISO_Left_Tab
! "Select next entry" Set from: Default
! rofi.kb-row-down:                    Down,Control+n
! "Go to next row, if one left, accept it, if no left next mode." Set from: Default
! rofi.kb-row-tab:                     Tab
! "Go to the previous page" Set from: Default
! rofi.kb-page-prev:                   Page_Up
! "Go to the next page" Set from: Default
! rofi.kb-page-next:                   Page_Down
! "Go to the first entry" Set from: Default
! rofi.kb-row-first:                   Home,KP_Home
! "Go to the last entry" Set from: Default
! rofi.kb-row-last:                    End,KP_End
! "Set selected item as input text" Set from: Default
! rofi.kb-row-select:                  Control+space
! "Take a screenshot of the rofi window" Set from: Default
! rofi.kb-screenshot:                  Alt+S
! "Toggle case sensitivity" Set from: Default
! rofi.kb-toggle-case-sensitivity:     grave,dead_grave
! "Toggle sort" Set from: Default
! rofi.kb-toggle-sort:                 Alt+grave
! "Quit rofi" Set from: Default
! rofi.kb-cancel:                      Escape,Control+g,Control+bracketleft
! "Custom keybinding 1" Set from: Default
! rofi.kb-custom-1:                    Alt+1
! "Custom keybinding 2" Set from: Default
! rofi.kb-custom-2:                    Alt+2
! "Custom keybinding 3" Set from: Default
! rofi.kb-custom-3:                    Alt+3
! "Custom keybinding 4" Set from: Default
! rofi.kb-custom-4:                    Alt+4
! "Custom Keybinding 5" Set from: Default
! rofi.kb-custom-5:                    Alt+5
! "Custom keybinding 6" Set from: Default
! rofi.kb-custom-6:                    Alt+6
! "Custom Keybinding 7" Set from: Default
! rofi.kb-custom-7:                    Alt+7
! "Custom keybinding 8" Set from: Default
! rofi.kb-custom-8:                    Alt+8
! "Custom keybinding 9" Set from: Default
! rofi.kb-custom-9:                    Alt+9
! "Custom keybinding 10" Set from: Default
! rofi.kb-custom-10:                   Alt+0
! "Custom keybinding 11" Set from: Default
! rofi.kb-custom-11:                   Alt+exclam
! "Custom keybinding 12" Set from: Default
! rofi.kb-custom-12:                   Alt+at
! "Csutom keybinding 13" Set from: Default
! rofi.kb-custom-13:                   Alt+numbersign
! "Custom keybinding 14" Set from: Default
! rofi.kb-custom-14:                   Alt+dollar
! "Custom keybinding 15" Set from: Default
! rofi.kb-custom-15:                   Alt+percent
! "Custom keybinding 16" Set from: Default
! rofi.kb-custom-16:                   Alt+dead_circumflex
! "Custom keybinding 17" Set from: Default
! rofi.kb-custom-17:                   Alt+ampersand
! "Custom keybinding 18" Set from: Default
! rofi.kb-custom-18:                   Alt+asterisk
! "Custom Keybinding 19" Set from: Default
! rofi.kb-custom-19:                   Alt+parenleft
! "Select row 1" Set from: Default
! rofi.kb-select-1:                    Super+1
! "Select row 2" Set from: Default
! rofi.kb-select-2:                    Super+2
! "Select row 3" Set from: Default
! rofi.kb-select-3:                    Super+3
! "Select row 4" Set from: Default
! rofi.kb-select-4:                    Super+4
! "Select row 5" Set from: Default
! rofi.kb-select-5:                    Super+5
! "Select row 6" Set from: Default
! rofi.kb-select-6:                    Super+6
! "Select row 7" Set from: Default
! rofi.kb-select-7:                    Super+7
! "Select row 8" Set from: Default
! rofi.kb-select-8:                    Super+8
! "Select row 9" Set from: Default
! rofi.kb-select-9:                    Super+9
! "Select row 10" Set from: Default
! rofi.kb-select-10:                   Super+0
! "Go to the previous column" Set from: Default
! rofi.ml-row-left:                    ScrollLeft
! "Go to the next column" Set from: Default
! rofi.ml-row-right:                   ScrollRight
! "Select previous entry" Set from: Default
! rofi.ml-row-up:                      ScrollUp
! "Select next entry" Set from: Default
! rofi.ml-row-down:                    ScrollDown
! "Select hovered row" Set from: Default
! rofi.me-select-entry:                MousePrimary
! "Accept hovered row" Set from: Default
! rofi.me-accept-entry:                MouseDPrimary
! "Accept hovered row with custom action" Set from: Default
! rofi.me-accept-custom:               Control+MouseDPrimary
At the top of the config file, the 1st line specifies the theme file that
defines various aspects of the looks of the rofi window:
rofi.theme: ./Arc-Dark.rasi
A number of themes are installed by default and stored in
/usr/share/rofi/themes/, you can pick one as a starting point to
customize to your liking. The one-liner interface shown in Figure 1
in achieved in the similar manner.