What is git?
git is a version control system (VCS)
git is a version control system developed by Linus Torvalds, who
is also the father of the Linux operating system, to facilitate the
development and maintenance of the Linux kernel. It helps programmers
to track the changes in the code and collaborate within a development team.
The story (ref1, ref2) goes that before git, the Linux kernel
development team was using a proprietary VCS software, BitKeeper,
whose owner later threatened to withdraw the free license after
noticing that one team member, Andrew Tridgell, attempted to reverse
engineer the BitKeeper protocol. After weeks of failed mediation with
BitKeeper, Linus decided to create his own VCS system. So he did,
within only a weekend’s time. About 2 months later, git was used to
manage a new Linux kernel release.
Therefore, git was initially created by and for programmers, and still
is mostly used by them. However, some of its features, particularly
the version control functionality can be used to track changes in
files other than source codes, and benefit researchers not majoring in
computer sciences.
Advantages of git as VCS over the file-renaming approach
The file-renaming approach
One of the core functionalities of git is version control. We
probably all have had the experience of copying the work-in-progress document
and renaming the file to indicate a version change:
manuscript_draft_1.tex
manuscript_draft_2.tex
manuscript_draft_3.tex
manuscript_draft_3_minor_change.tex
manuscript_draft_4.tex
...
manuscript_final.tex
manuscript_final_with_minor.tex
manuscript_final_with_minor_new_figure.tex
manuscript_final_with_minor_new_figure_and_table.tex
...
Each of these suffixes labels a new version of the same document, and collectively they form a development history. Being the easiest and most native version control approach, it has 4 major disadvantages:
- Version history quickly becomes obscure and difficult to track the changes.
As the revisions pile up, it becomes increasingly difficult to summarize a new version into a few words that can fit into the file name. A numerical version number is nice and clean, but it doesn’t carry much information about what exactly has been changed. Over time (maybe after a month?), the file names start to lose their meanings to you, and you start to look at the modification time instead to order the versions and find the latest one.
- Difficult to implement "branches" in the versions
I’m already using the git terminology. By "branches" I mean some kind
of alternative pathways of the development of the document. Say for
instance, after manuscript_draft_4.tex you decide to revert back to
an earlier manuscript_draft_2.tex and start working from there on,
so the subsequent development diverges into two separate
branches/pathways: one continuing the manuscript_draft_4.tex line of
thought and the other going in the direction of
manuscript_draft_2.tex. How would you name the next version of the
latter line? manuscript_draft_5.tex? That would be equally legit as
the next iteration of the manuscript_draft_4.tex branch. I think you
get the idea. This suffix-appending scheme may be
suffice if you have a single linear development pathway and each
new iteration is based only on its immediate predecessor.
"Alternative universes" are not easy to maintain in this manner.
- Prone to data loss and difficulties in maintaining multiple copies
Before using git when I needed to maintain multiple copies of the
same document across different machines, for instance one in my office desktop
and another my personal laptop, I used a USB flash drive to copy files
over. Other than the slight inconvenience involved in carrying the
drive around, plugging-in/out and copying/pasting, it worked fine.
Until one time I confused myself with which one was the newer version
and overwrote the newer with the older. Because versioning is done by
nothing but the creation of new files, once the files themselves are
lost or overwritten, one loses the version as well. It is also
inconvenient to maintain multiple copies of the same document
versions, as you have to copy all the version files over in order to
retain the entire version history.
- Duplicate copies take more disk spaces.
With the hard drives becoming cheaper, some additional disk space usage is not a big deal today, however it still clutters up your project folder, and makes collaboration less convenient.
The git way
With git as the version control system, there would be a single
manuscript.tex file in the project folder, and the different
versions are tracked and represented by different commits
(we will go deeper into such concepts later). Then the revision
history would look like this:
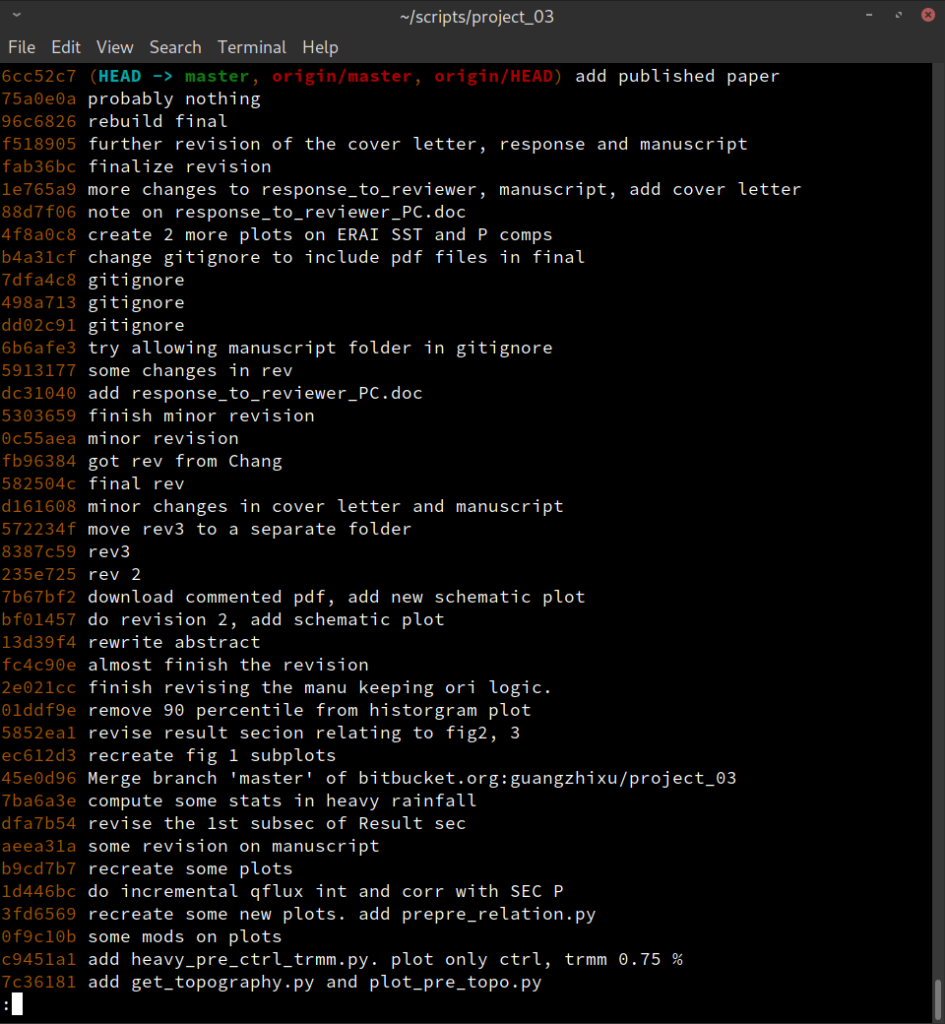
git log --oneline command.More information can be displayed if such one-liner descriptions are not informative enough:
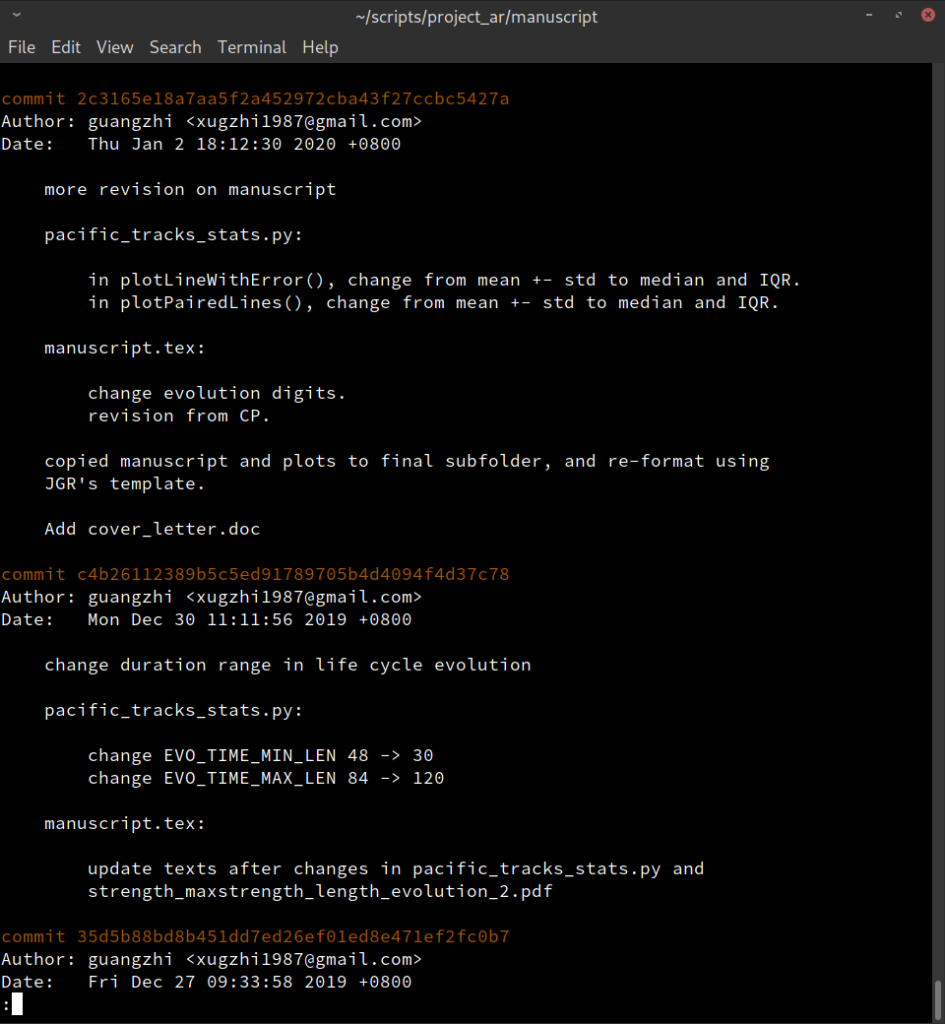
git log command.You can browse through the commit history, perform a filtering by the
contributor’s name, the time period or track down some individual
files/folders. It also allows one to revert back to a previous version
and start working from there on, or compare the changes between any 2
commits. With proper usages of the git commands, the entire editing
history of the document(s) can be recorded and there will be no lost of
data even if you mistakenly overwrite or delete the file(s). Maintenance
of multiple copies can also be achieved by pushing and pulling from a
remote repository on different machines.
In the next session I will introduce some basic concepts of git by
walking you through a common git workflow. In so doing I will also
cover some of the most frequently used git commands. git is
available in all major platforms including Linux, MaxOS and
Windows, with a terminal command line interface or a graphical
interface. I’ll be covering only the Linux command line usage of
git. If you choose to use a GUI implementation of git or in a
different OS, the exact procedures will show some differences, but the
basic concepts are the same.
Basic concepts and a sample workflow
Step 0: Install git and do some configurations
git comes pre-installed in some Linux distros. In case not already
installed, it is recommended to install it from the distro’s software
repository. For instance, for Debian based distros, do
apt install git
For Arch based distros, use pacman:
pacman -S git
After installation, it is recommended to do some basic configurations:
git config --global user.name <name>
git config --global user.email <email>
git config --global core.editor vim
git config --global alias.ci commit
git config --global alias.st status
The --global flag makes these configurations global to all
repositories (we will talk about what git repositories are in a
minute) of the current user of the system. git has 3 levels of
configurations, stored in 3 different files:
| level | config file location | purpose |
|---|---|---|
| local | =<repo>/.git/config= | repository specific settings |
| global | =~/.gitconfig= | user specific settings |
| system | =/etc/gitconfig= | system-wide settings |
The local level config will overwrite global and system ones.
Adding the --local flag, or not giving level option to the git config command
will set the configs to local level.
In those configs, user.name and user.email define some user
information. These are used to label a contributor in a git
repository. This information is more important when there are multiple
contributors working on a same project.
The alias.ci and alias.st lines define aliases for the 2 most
frequently used git commands. They allow you to use
git st
in the command line to achieve the same as if you have typed
git status
Similarly, git ci is short for git commit.
All configuration options are stored in plain text files, and you can use
git config --global --edit
to open the configuration file (in this case, ~/.gitconfig) in a
text editor to modify these settings. Typically, you only need to do
such configurations for once after you do a new git installation on
a new working machine, then you can forget about it and focus on the
everyday usage.
Step 1a: Create a repository
After setting up git, the next step would be to create a new git repository (repo for short). A repo is a virtual container of the
files of a project. From a file system point of view, it is nothing
but a normal folder in the computer, whether it running Linux,
Mac or Windows. In that repo folder, git maintains a special
.git subfolder (note the leading dot in the directory name) where it
stores the repo configurations, metadata and the history of
changes. In short, all the magic of git happens inside this .git
folder. Outside of .git, you manage files just like in any normal
folder. Once you delete .git, you delete the git repo as well, and it
becomes truly an ordinary folder in the file system.
There are more than 1 ways to create a git repo, and it is possible to
use git as a standalone, offline version control system without
connecting to any remote server. However, we will be focusing on a
more typical workflow where you maintain a local copy of a git repo in
one machine and a remote repo hosted in a hosting service.
Popular choices of git repo hosting services include Github,
bitbucket and Gitlab. I used bitbucket initially, then migrated
over to Github after it opened private repos for free and I started to
experience some connectivity issues with bitbucket (the migration from
one service to another is super easy, just a few clicks in the web
interface). I had little experience with Gitlab. It allows you to
deploy your own host in your own server. In the rest of the post we
will be using Github as our hosting service.
After registering an account with Github, you create a new repository from the web interface of Github. Then it presents you a form like the following to fill:
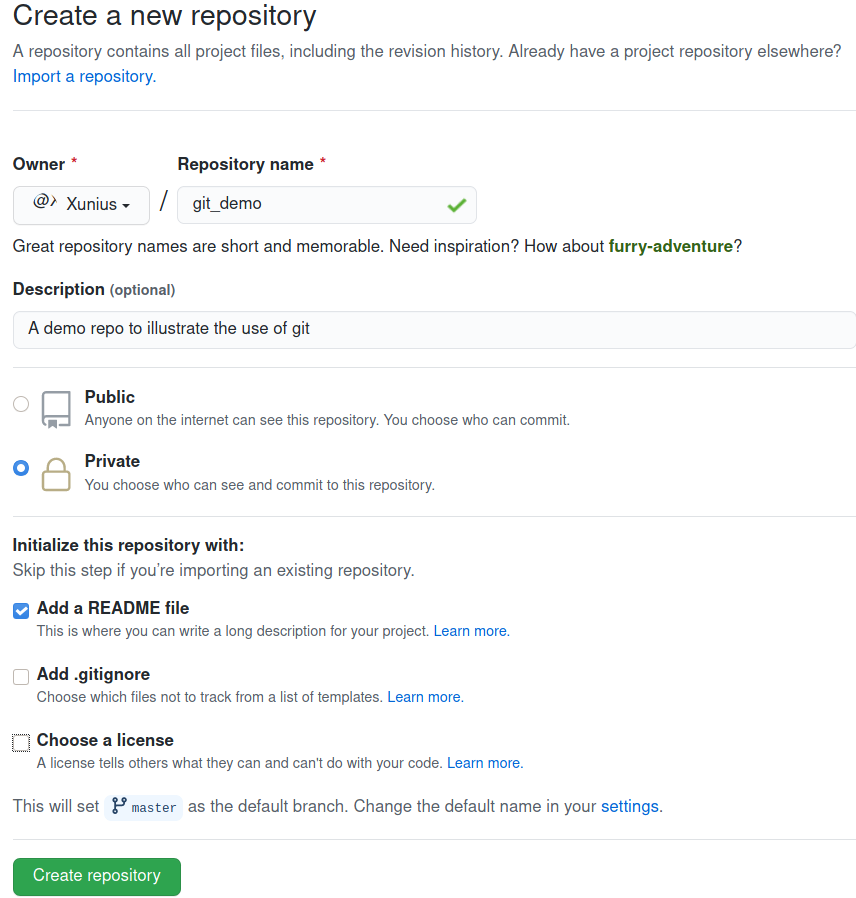
Aside from Owner and Repository name, all other fields are optional.
In this demo, we named the repo git_demo, and gave it a one sentence
description A demo repo to illustrate the use of git.
We toggled the Private radio button to make it a private repo, and
chose to initialize the repo with a default README file. All these
settings, including the repo name, can be changed later on.
After clicking the Create repository button, Github will do the
demanded job and present you with this screen after it finishes:
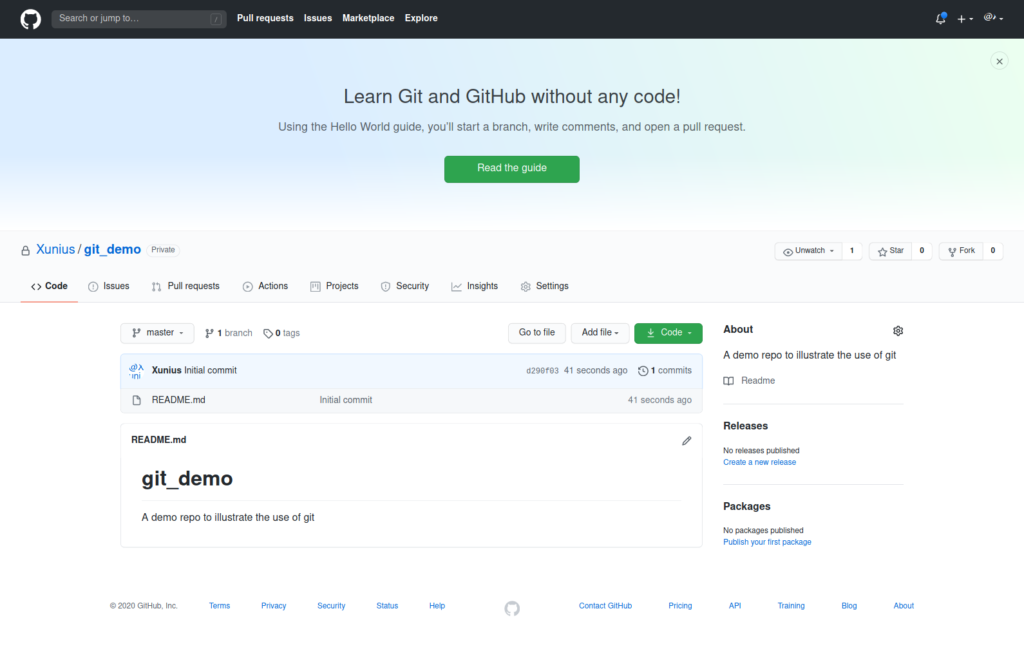
It can be seen that in the repo there is currently only one file
README.md that Github created for us. Its contents are displayed
below. Currently it only has a title "git_demo" and the description
line we added earlier on.
Then we click on the green button labeled "Code", and copy this line
of code into the clipboard:
git@github.com:Xunius/git_demo.git
This is the URL address of our repo. NOTE that yours will be different.
Go to a terminal window, navigate into a folder where you want to store the repo, and type in the following command (paste the copied URL from clipboard):
git clone git@github.com:Xunius/git_demo.git
Again use your own URL in the command. Hit enter to execute it. Here is the screenshot of the output:
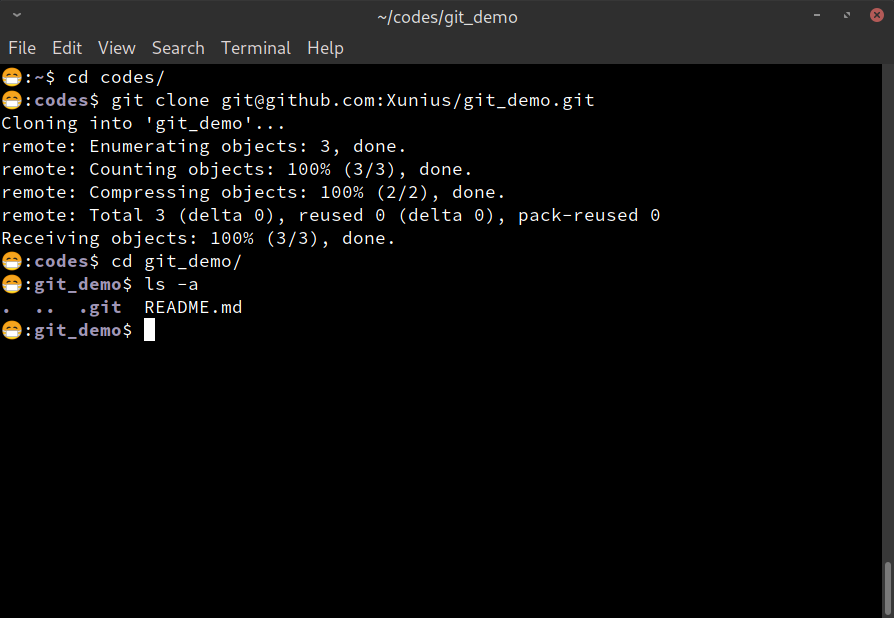
git clone command.After git clone, we navigated into the newly created git_demo
folder (now it is a git repo), and showed its contents. You can see
the .git folder, and the README.md file.
Now we have a local, private copy of the repo, which is connected to and tracking the remote repo hosted in Github. Next we will be working with our own local copy of the repo. Imagine this is a collaborative work. Other members of the team will be working on their own copies as well.
Step 2: Make changes in the working directory
In the cloned repo, we do some serious, world-changing work:
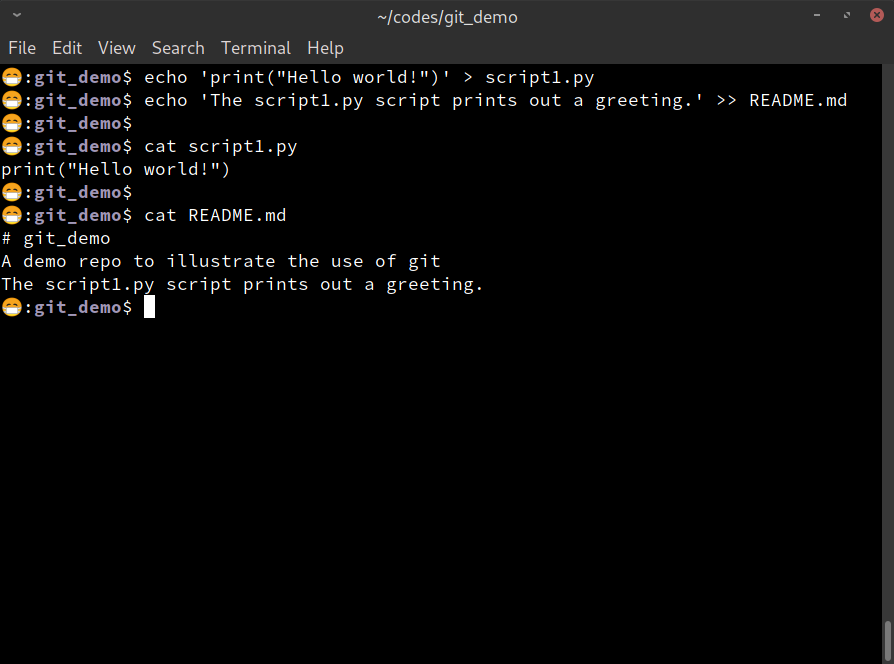
We added a new script1.py file, and appended a new line to the end
of README.md. In real world applications you will be writing some
code files or manuscript files, creating some images etc..
Now examine the current status of the repo, using the
git st
command. (Remember that we have aliased status to st). Here is the
output:
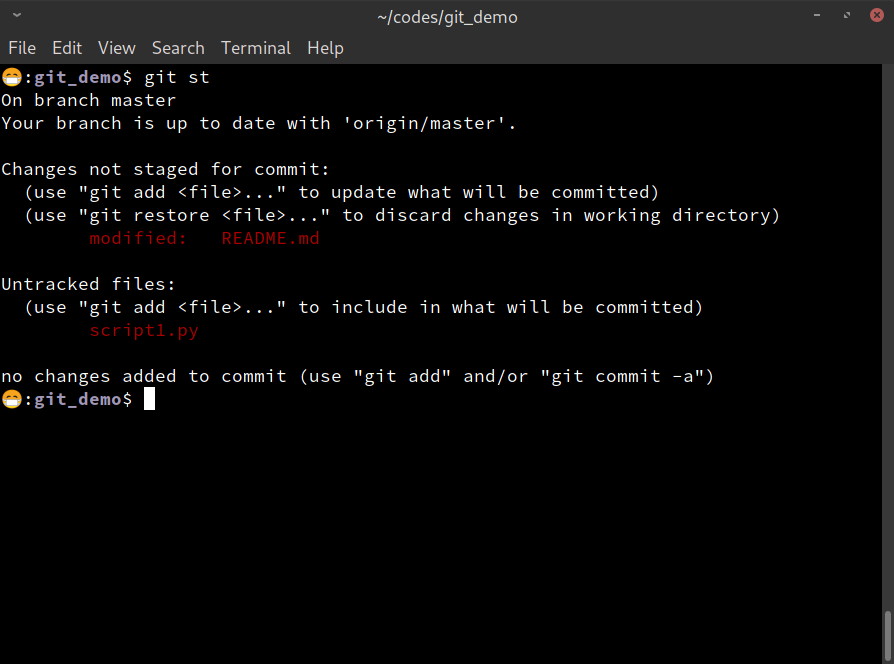
git status command.Notice that git informs us that there is one modified file
(modified: README.md), under the Changes not staged for commit:
category. And the script1.py file is under the Untracked files:
category. What do these mean?
In a git repo, there is a staging area, which is a kind of
"preparation area" for one to prepare for the changes to be committed
(see the schematic in Figure 8).
You can make various changes to the files in the repo, like creating
new files/folders, modifying existing ones, renaming or deleting
things. All these happen in the working directory of the git
repo, but nothing has been added to the staging area just yet.
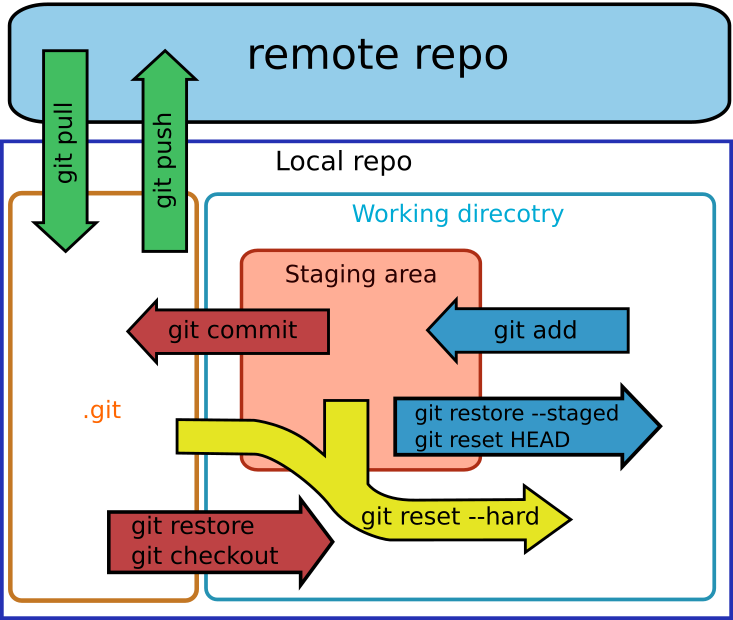
git repo and its functioning.After making some changes in the working directory, you can choose to add some specific changes, or all of them, to the staging area in preparation for a commit. You could also remove some files from the staging area, or make some more changes and add them to the staging area. Once you are happy with the changes in the staging area, you move onto the next step and commit these changes.
Therefore the general workflow is (see the schematic in Figure 8):
- a. make new changes.
- b. add to the staging area (
git add). - c. commit changes in the staging area (
git ci).
In this demo, we would like to add all the new changes to the staging area. We can achieve this by using:
git add -A
or
git add --all
NOTE there is subtle differences between git add -A, git add *
and git add .. The most robust and recommended way is git add -A.
The below image shows the output of git st after git add -A:
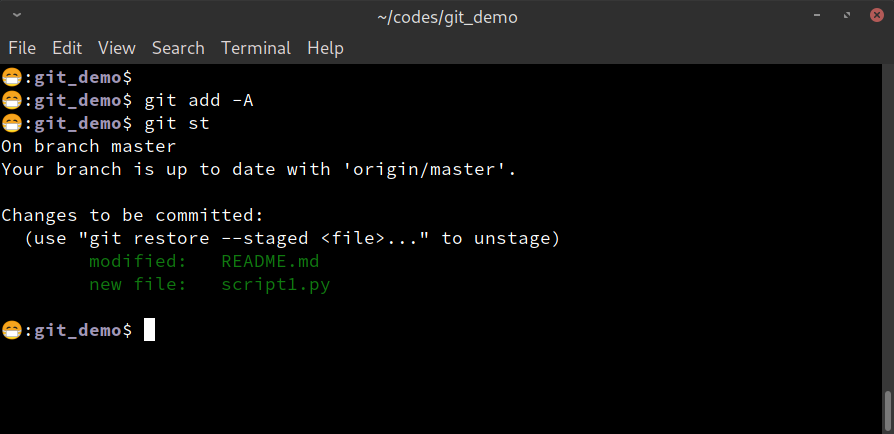
git add -A command.Step 3: Make commits
The git commit command
After finishing building the staging area, we can commit these new changes using:
git ci
(Remember that we have aliased commit to ci).
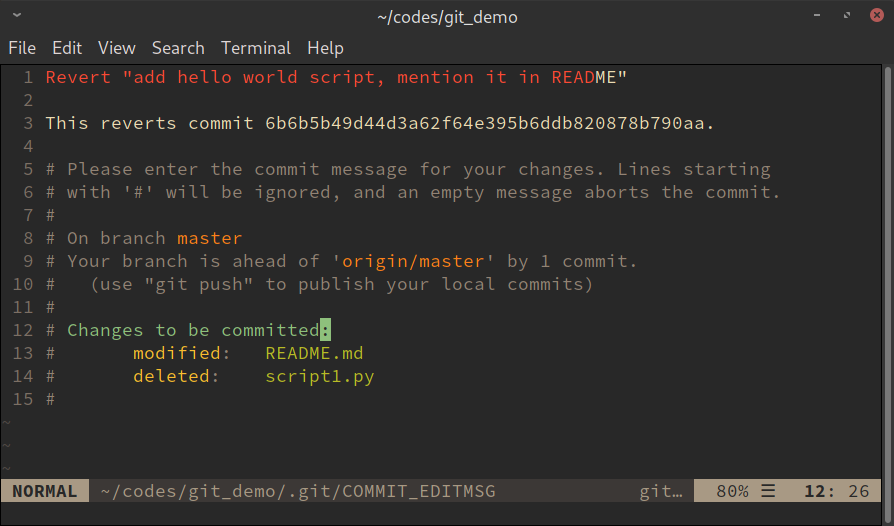
Then git will open an editor for you to type in the commit
messages, see Figure 10 below.
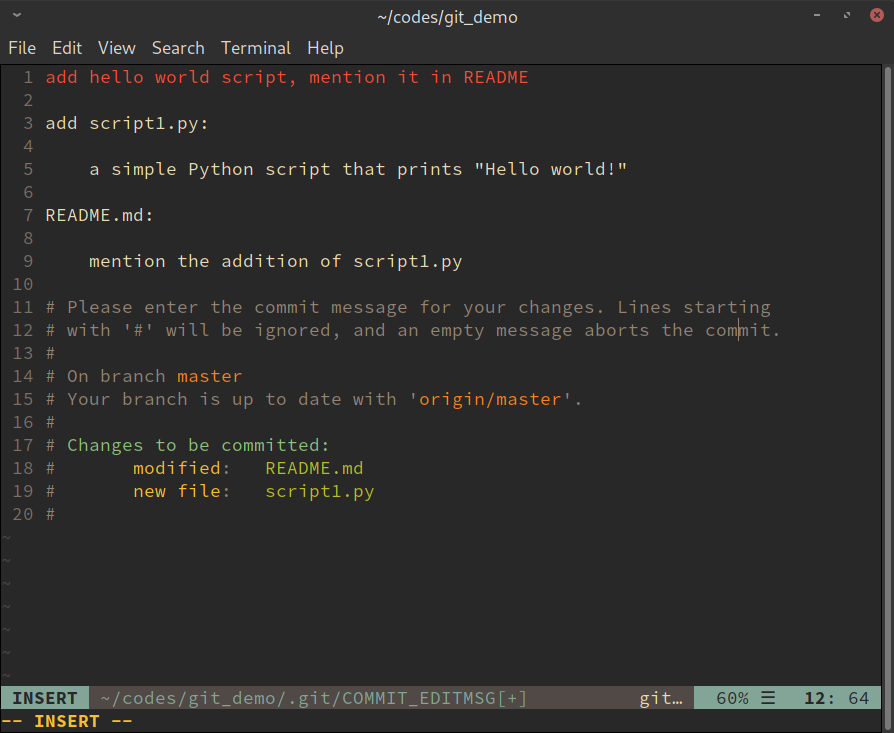
Since we have set the default git editor to vim (see
above), it opened a vim session for me to edit the commit messages.
The very first line is the title of this commit, and due to some historical reasons, it is recommended to limit the length of commit title within 50 characters. This also encourages one to build more atomic changes (talked in a min).
The lines starting with a # sign are comments created by git, and
thing between the title line and the comments are more detailed
descriptions of the commit. You may choose to put some records on all
the changed files, or only those most important ones. The key idea is
to make it easier for someone else, or your future self, who would be
examining the git log to get a good knowledge about this particular
commit.
Lastly, after one saves and closes this file, the commit is done.
What are git commits?
Those changes in the staging area are committed into the repo’s history, while those changes you made in the working directory but not added to the staging area, if there are any, are not committed.
A commit is like a snapshot of the repo, it records the current status
of all the tracked files in the working directory. Things that have
been added by the git add command get some kind of index updated for git
to track their status across the development stages. Things that are
added to the working directory but have not been added by git add
are not tracked, and a git commit won’t affect such untracked
files.
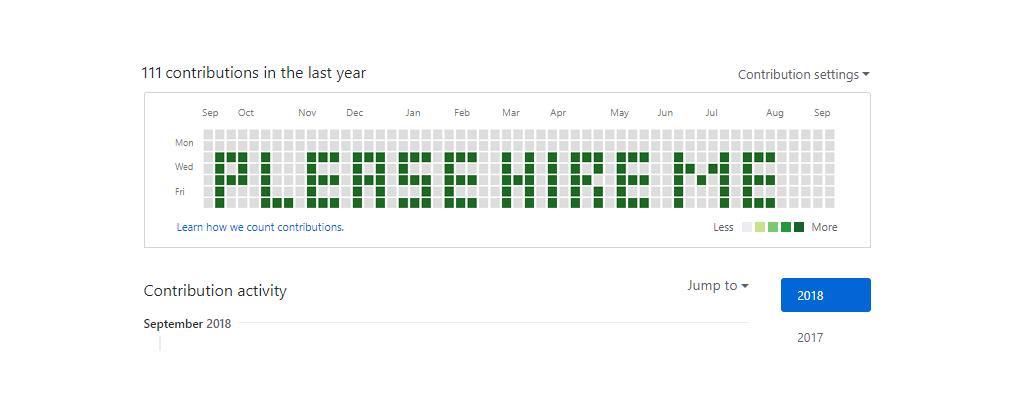
Over time, you will be making more and more commits, which would start
to form a trace of history, like shown in Figure 1. You can look
back at them using the git log command.
For each commit there is a string label, e.g. 6cc52c7, that uniquely
defines a commit. The current commit also gets a special "label",
HEAD (all in capitals), that by default points to the latest commit.
Try making atomic commits
A good practice of using git is to make atomic commits. "Atomic"
means that a single commit contains only some tightly related changes
about a very specific issue, a feature, or a topic. In our
demo changes made in Step 2, the new script1.py file and the
modified README.md file are all about a new Python script added to
the project, so they qualify as an atomic change. If there had been
another new file doing something totally unrelated, it would be better
to leave that to another commit. You can see that the staging area is
there to help one build atomic changes: you can make a bunch of
changes to the working directory, but commit them little by little,
each time as an atomic commit.
The advantage of doing atomic commits is to make future maintenance easier. Imagine you make a big commit that bundles multiple new features/new chapters into the code/manuscript, and weeks later you realize there was an error in one of these features/chapters and you need to revert back to the commit where the mistake was made and correct it. Bundled commits make it difficult to pin-point where exactly the issue happened; and even if you do locate it, difficult to perform an accurate surgery that doesn’t affect other unrelated things.
Step 4 [optional] Undo local changes
I made this step optional because you don’t always need to do this.
If everything goes correctly, you can move onto step
5. However, we make mistakes, and git provides us some mechanisms to
undo them. Note that these undo mechanisms are specific to the local
repository, before the changes have been pushed to the remote.
In step 2 we saw that git has a staging area, and to
commit some changes there are 2 separate steps: adding to the staging
area and committing from the staging area. Therefore there are different
undo commands for different situations.
Undo git add
The 1st type is to undo the git add process: you added some changes
to the staging area, but later decide to take them down. To achieve
this, use git restore --staged or git reset HEAD. For instance,
git restore --staged script1.py
or
git restore HEAD script1.py
takes the changes involving the script1.py file out from the staging
area. To take down everything down from the staging area:
git restore --staged .
git restore HEAD
Note that in Figure 9 after we ran the git add -A command, the git st output already offered you
this git restore --staged <file> option:
Changes to be committed:
	(use "git restore --staged <file>..." to unstage)
If you read other tutorials online, you might find that a different option is given instead:
Changes to be committed:
	(use "git reset HEAD <file>..." to unstage)
This is because git restore is a relatively new feature added in
version 2.23 (Aug 2019) (see this post), before that, git reset HEAD was the
method to take down some staged files. In newer versions after 2.23,
both methods work, therefore I included both in the schematic in
Figure 8.
Undo changes in working directory
git restore or git reset HEAD only takes down the changed files
from the staging area, but that doesn’t make them not "changed
files" – the changes are still there, in those files in the working
directory. What if you really screwed up and want to revert the
changes made to the files?
To achieve this, use
git restore <file>
or
git checkout <file>
to discard the changes made to <file> and revert it to the last commit.
To discard all new changes in all files, use
git restore .
or
git checkout .
(see Figure 8).
Note that in Figure 7 after we made the new changes to script1.py
and README.ms, the git st output already offered you
this git restore <file> option:
Changes not staged for commit:
	(use "git add <file>..." to update what will be committed)
	(use "git restore <file>..." to discard changes in working directory)
	modified:   README.md
Again, this git restore is new in version 2.23, and git checkout
was the old way of doing this, but still works in new versions.
Also note that when you discard changes using git restore or git checkout, those changes are lost permanently. In case you want to
retain these changes for later, check out the git stash command.
Undo git add and changes in working directory
To reset the staging area and the working directory to match the most recent commit, use:
git reset --hard
(See the big yellow arrow in Figure 8).
This has the combined effects of git restore --staged and git checkout. After this, the staging area is clear, and no difference
exists between any file in the working directory from the last
commit. Again, any change you made is permanently lost, so use with
care.
Undo git commit
If some changes have already been committed to the git history, there
are 2 ways to "undo" them:
git commit --amend
This can be used to modify the most recent commit. Suppose after we
committed the changes made to script1.py, we decide to let it
print Goodbye world! instead of Hello world!, we could:
- a. edit the
script1.pyfile to implement the new changes. - b. run
git commit --amend --no-edit
Or, we are happy about the changes in both script1.py and
README.md, but only need to modify the commit messages. Then simply
run
git commit --amend
It will prompt you to edit the commit message again.
Note that git commit --amend doesn’t alter the most recent commit,
but replaces it with an entirely new one.
git revert
The command
git revert <commit>
undoes a specified commit, but it does this not by going back to a previous commit, but by getting the state right before the target commit, creating a new snapshot of it, and appending the old state as the new HEAD state (latest commit).
For instance, after we committed the change that adds script1.py and
modifies README.md, the latest state is the one labeled HEAD in
Figure 11. To revert the previous commit, we can use
git revert HEAD
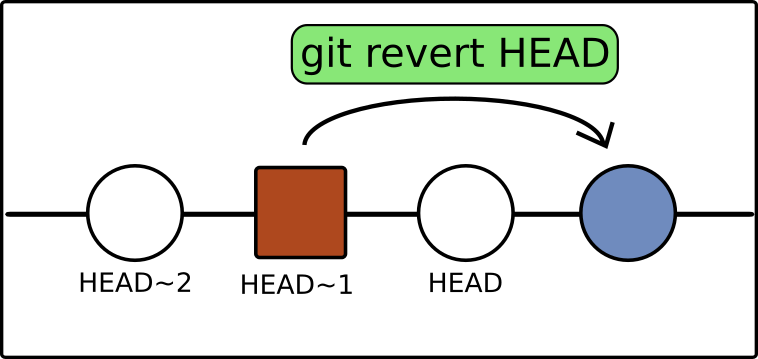
git revert command.Note that it will get back to the state right before the target
state, i.e. the one labeled HEAD~1 in Figure 11. This tilda-number
(~n) expression is used to specify a commit relative to HEAD, in
this case, one step backwards from HEAD. Otherwise you will have to
use git log to find the hash label to specify the target commit.
As illustrated in Figure 11, this goes back to HEAD~1, and makes a copy of it and appends the copy to the end, so it becomes the new HEAD.
When executing git revert, it will prompt you an editor window, like
the one below, to enter the commit messages for this new commit. All the
contents shown in Figure 12 are filled automatically by git and I
didn’t change anything.
git revert command.Saving and quitting the editor window finishes the commit.
If you want to revert several steps back, you will have to use
git revert --no-commit <commit>..HEAD
git ci
This will revert everything from the HEAD back to the commit specified by <commit>, again by recreating that commit state and appending it to the end to make it the new HEAD.
The --no-commit flag tells git not to prompt for a message for
each commit along the way, but revert all the way back to <commit> in
one go.
Step 5 Push to remote
Suppose we have done a whole day’s work at office but we need to do some extra bit during off-work time, we can push the local repository to the remote. This is like "publishing" the local copy onto the remote "hub" such that other people, or you yourself from a different machine, can get access to the updated files and continue working from there.
First, do a git st to check out the current status:
git st
It shows that
Your branch is ahead of 'origin/master' by 2 commits.
	(use "git push" to publish your local commits)
Then use git push to push the local repo to remote. Below is a
screenshot showing the entire process:
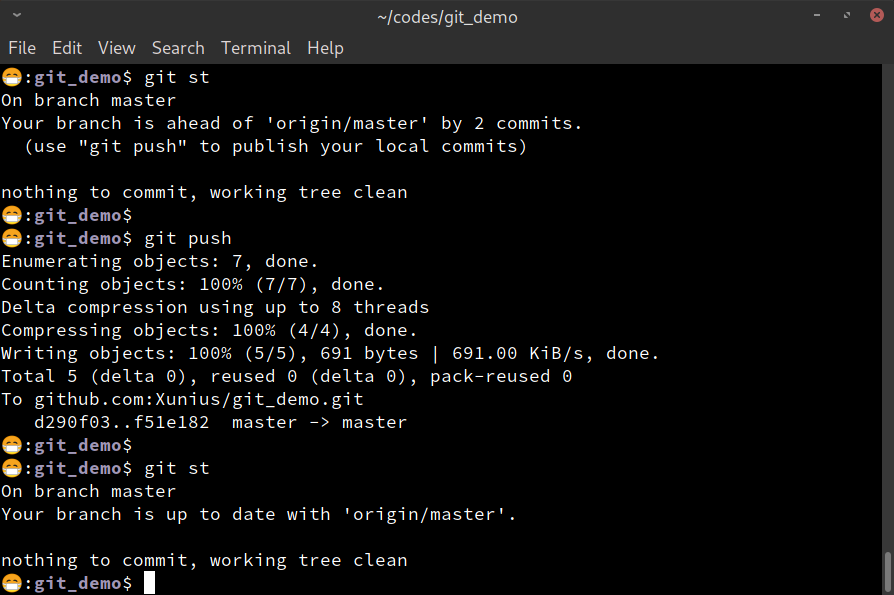
git push command.Step 1b:Pull from remote
Suppose we have got back home and would like to continue working on the
project. If this is the first time working with git on the home
computer, we will have to repeat the installation and setup procedures
as described in Step 0, and get a local copy of the repo by using
the git clone command. In all subsequent sessions we only need to
pull the latest updates from the remote repo to the local machine:
git pull
This downloads the changes from the remote repo instance to the local one. Therefore, the combination of git push and git pull achieves synchronization between multiple repos. Compared with the flash-drive-copy synchronization strategy, this is both more convenient and less error-prone. There is no danger of mistakenly overwriting something with an old copy, because it always pulls the latest.
Summary
This section introduces a typical git workflow and some of the basic
concepts. To summarize the entire process:
If this is the 1st time using git to setup a project.
You will be using these steps:
- Step 0: Install and config
git. - Step 1a: Create a repo.
- Step 2: Make changes in the working directory.
- Step 3: Make commits.
- Step 4: [optional] Undo local changes.
- Step 5: Push to remote.
- Step 1b: Pull from remote.
Then, for subsequent sessions, you will be repeating the sequence of
Step 1b -> 2 -> 3 -> 4 -> 5 -> 1b.
git has many other commands, some of which are for collaborations
among a team. Since I mostly use git as a single user those are not
covered in this post. Hopefully these are enough to get you started.
Work with branches
Previously I mentioned that git can help manage different
development pathways, or different branches.
By default, the main branch is called master (yes I’m sticking to the "racist" terminology, thank you). When creating a new brand new repo, that is also the only branch.
People typically create a new branch for new development work. For instance, correcting a bug, adding a new feature, or some experimental work that shouldn’t be integrated into master before fully functional. If you are doing some writing, whether it being academic writing, fictional or playwriting, you can use a new branch to experiment with a different structure of the article, a different plot of the story or a different ending of a character etc.. Different branches are isolated from each other, like parallel universes, so that there is no danger of losing the original work if the experimentation doesn’t work out well. After fully developed, one can choose to merge the development branch into the master branch, and optionally delete the development branch.
Here are some commonly used branching commands in git:
git branch: list all local branches.git branch -v: list all local branches and their respective. latest commits.git branch -a: list all local and remote branches.git branch <branch_name>: create a new branch named <branch_name>.git checkout <branch_name>: switch to branch named <branch_name>.git checkout -b <branch_name>: create a new branch and switch to it.git branch -d <branch_name>: delete the branch named <branch_name> from local repo.git merge <branch_name>: merge the branch <branch_name> into the current branch.
Others
There are some additional points that are worth noting:
No shame in using the copying-renaming method, and a mental change
To be fair, I still use the file copying-and-renaming method even in
my git repos. It is the easiest and fastest way to create some
temporary versioning. For instance, when I need to compare multiple
different solutions to a problem, having multiple versions of the same
Python script allows me to execute each in a different Python session and
compare their results. There is no reason not to use a
method if it suits the problem best.
Aside from all the technical differences, I feel that there is also a
very important psychological factor involved in a VCS workflow like
git. Sometimes I would rush out a few computation scripts in a
single morning. It does feel like a good amount of work done, but it
also leaves quite a mental burden on me: I can’t help worrying
about the possible errors hidden inside those scripts. Are they
isolated mistakes? Or do they have some far-reaching impacts that could
possibly affect my subsequent analyses? Whenever there are some
significant changes happening in the repo during a short period of time, such
kind of anxiety would start to hurt. Then I won’t feel released until
I do a review in the commit messages on very file changed. The
relief is almost instantaneous: once the commits are done, I know for
sure that they are "engraved" into the git history, labeled,
ordered, tracked and isolated. I know where to find them and I know
they are only there, not anywhere else. I feel increasingly accustomed
to such kind of "milestone" and "registration" mental effects in my everyday usage
of git, and I feel that it does help me get more organized about
my researches.
git works best with plain text files, not large binary files
When you manage file versions using the copy-renaming scheme, you
end up with multiple copies of the same file, taking up unnecessary
disk spaces. In git, versions are saved incrementally, meaning
that when updating from one commit to another, only the changes
during the process are saved. This is more efficient not only for storage
but also for file transfers.
However, this incremental saving manner only works for plain text
files, such as txt and md files. Source codes of all
programming languages, including LaTeX source codes are plain text
files. Note that PDF, DOC, ODF and image files are binary files,
not plain texts. git can generate binary diffs, but the result won’t
be human readable (see ref1, ref2).
It is also not encouraged to put large data files into a git repo,
things like videos, NetCDF or dat files are not suitable to be
stored in git. If they are quite small in size, it is Ok to save some
of them, but not in large numbers. Anything goes above ~ 50 MB
should probably be saved elsewhere.
gitignore
One can create a .gitignore file (note the leading dot) in the git
repo to tell git not to track some files/folders. This can be used
to prevent some temporary files from being tracked, for instance the
pyc files created by Python interpreter, the .swp files created
by vim, or the build folder created by some compilers. For more
information regarding .gitignore, see ref1, ref2.
The new git restore and git switch commands
We talked about the newly added git restore command. It was meant to replace some functionalities in git checkout
and git reset. git switch is another newly introduced command
meant to be used to switch branches. For more information, see ref1,
ref2.
Write good commit messages
It is regarded good practice to stick to a good format and write informative commit messages, even if you are the only person working on the project (because in some sense, your future self is not too different from a whole different person). Here are some guidelines regarding writing good commit messages: ref1, ref2.
With good commit messages, your git log output can be used as a
log/journal of your research/project development. It can help you
trace back errors, or provide some lessons to help you progress
further in your career.

Manage multiple repos
It is possible that one has to manage multiple local repos in a single machine, each one for a different project. I have about 10 repos that I work with regularly, and about another 10 that I rarely touch anymore. As the number grows, it becomes more difficult to manage all those repos. In a future post I’ll share a script that I created that "scans" through a collection of repos and generates a report for me, telling me which one is lagging behind the remote, which has uncommitted changes etc.. So stay tuned.


[…] a previous post I introduced some basic usages of git. I create git repos (short for repositories) for various […]